> ## Documentation Index
> Fetch the complete documentation index at: https://help.kwentra.com/llms.txt
> Use this file to discover all available pages before exploring further.
# Scheduled Reports
> Automate report delivery from Front Office Settings — schedule reports to run on set intervals and email them to recipients daily, weekly, monthly, or yearly.
Schedule reports to run on set intervals and email them to recipients automatically — daily, weekly, monthly, or yearly.
### **Business Value**
* Automates report delivery so recipients receive reports without manual exports.
* Repeats schedules daily, weekly, monthly, or yearly until a chosen end date.
* Emails reports to multiple recipients at a set time.
* Applies saved filters so each run uses the parameters you need.
* Bundles multiple reports into one schedule sent to the same people.
### **Use Cases**
* Revenue manager schedules a daily occupancy report emailed each morning to the leadership team.
* Finance manager sets a monthly report to run on the first day and send to accounting.
* Operations manager bundles several reports into one weekly schedule for the same recipients.
### **How It Works**
| **Where:** Front Office → Settings → Scheduled Reports |
| ------------------------------------------------------ |
* Go to **Front Office → Settings** and open **Scheduled Reports**. The screen lists your existing schedules.
* Click **Add New Schedule**.
* Enter a **Schedule Name**.
* Set the schedule's **start and end dates** — you can run the schedule through to the end of the year.
* Choose whether the schedule **repeats**, and how often: **Daily**, **Weekly**, **Monthly**, or **Yearly**.
* Set the **Time** the report runs and click **Ok** to confirm.
* Add **Recipients** — type an email, then press comma or Enter to add more than one.
* Select the **Report Name** from the list of all Kwentra reports; search to find the one you want.
* Click **Add Filters** to set the report parameters used on every run.
* Choose the **date intervals** for the run, such as **First day of the current month**. Each report's filters match its original report parameters.
* Click **Apply Filters**.
* Click **Save Schedule**. A **Scheduled report was created successfully** confirmation appears.
#### **Adding Multiple Reports to One Schedule**
* Before saving, click **Add Report Block** to add another report to the same schedule.
* Each report block has its own report and filters, but all reports in the schedule run on the same interval and are sent to the same recipients.
#### **Managing Schedules**
* Back on the **Scheduled Reports** screen, each schedule can be **Disabled**, **Edited**, or **Deleted**.
| Note: Date intervals are relative — for example, **First day of the current month** — so every run automatically uses the correct dates for that period. |
| -------------------------------------------------------------------------------------------------------------------------------------------------------- |
## ***Update: June 25, 2026***
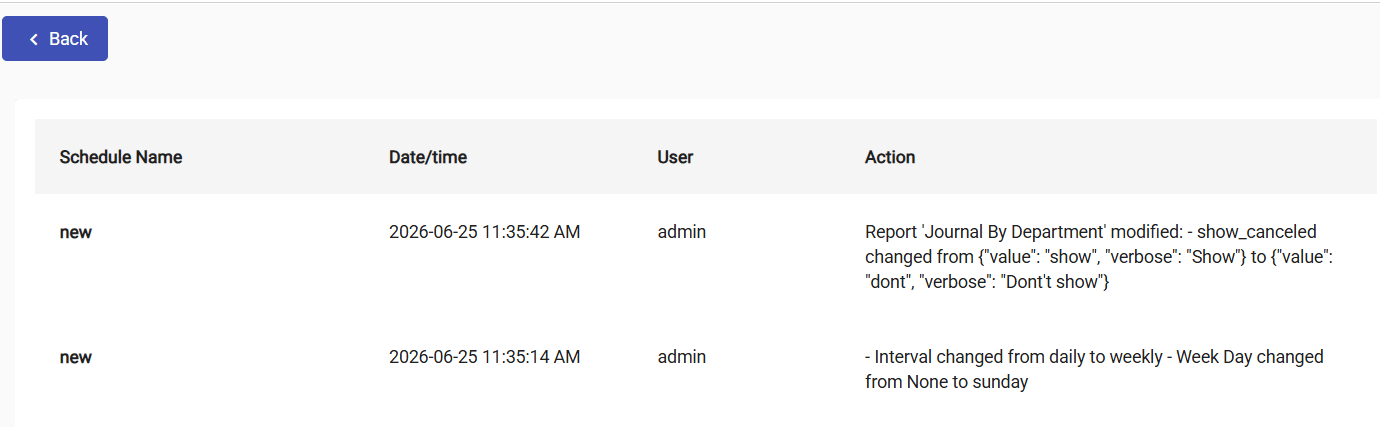
Scheduled Reports now keeps an **Assignment History** so you can review every schedule that has been created, edited, or deleted — including exactly what changed on each edit.
| **Where:** Front Office → Settings → Scheduled Reports → Assignment History |
| --------------------------------------------------------------------------- |
* Open **Assignment History** from the Scheduled Reports screen to see the log of past schedule actions.
* Each entry records the **Schedule Name**, **Date/time**, the **User** who made the change, and the **Action** taken.
* The **Action** spells out exactly what changed on an edit — for example, *Interval changed from daily to weekly*, *Week Day changed from None to sunday*, or a report filter changed from one value to another.
* Use the **Created** filter to show schedules that have been created, and the **Deleted** filter to show schedules that have been removed from the active list.
* To remove a schedule, click its **delete** icon and confirm with **Delete**. The schedule is permanently removed and then appears under the **Deleted** filter.
* Click **Back** to return to the previous Scheduled Reports screen.
| Note: A deleted schedule stops running once removed; it stays visible under the **Deleted** filter for reference. |
| ----------------------------------------------------------------------------------------------------------------- |