Documentation Index
Fetch the complete documentation index at: https://help.kwentra.com/llms.txt
Use this file to discover all available pages before exploring further.
December 11, 2023
Ability To Resend ETA Invalid Invoices
Integration Update: you can now easily resend invalid invoices from kwentra PMS to ETA Portal.New ETA Logs Screen
Integration Update: identifying the reason why an invoice was marked as invalid or have failed from ETA portal is now easier using the new Logs screen for ETA integration.**February 2023 Update:** The system currently concatenates “Kwentra Folio Number” to the folio sent to ETA for easier traceability.December 4, 2023
Improvements to ETA Status Screen for Folio Management and Cancellations
Settings → Integrations → ETA → StatusWe are excited to share recent enhancements to our ETA Status screen. These modifications aim to streamline the folio management process, providing you with a more intuitive and efficient user experience. Please review the details below to familiarize yourself with the changes.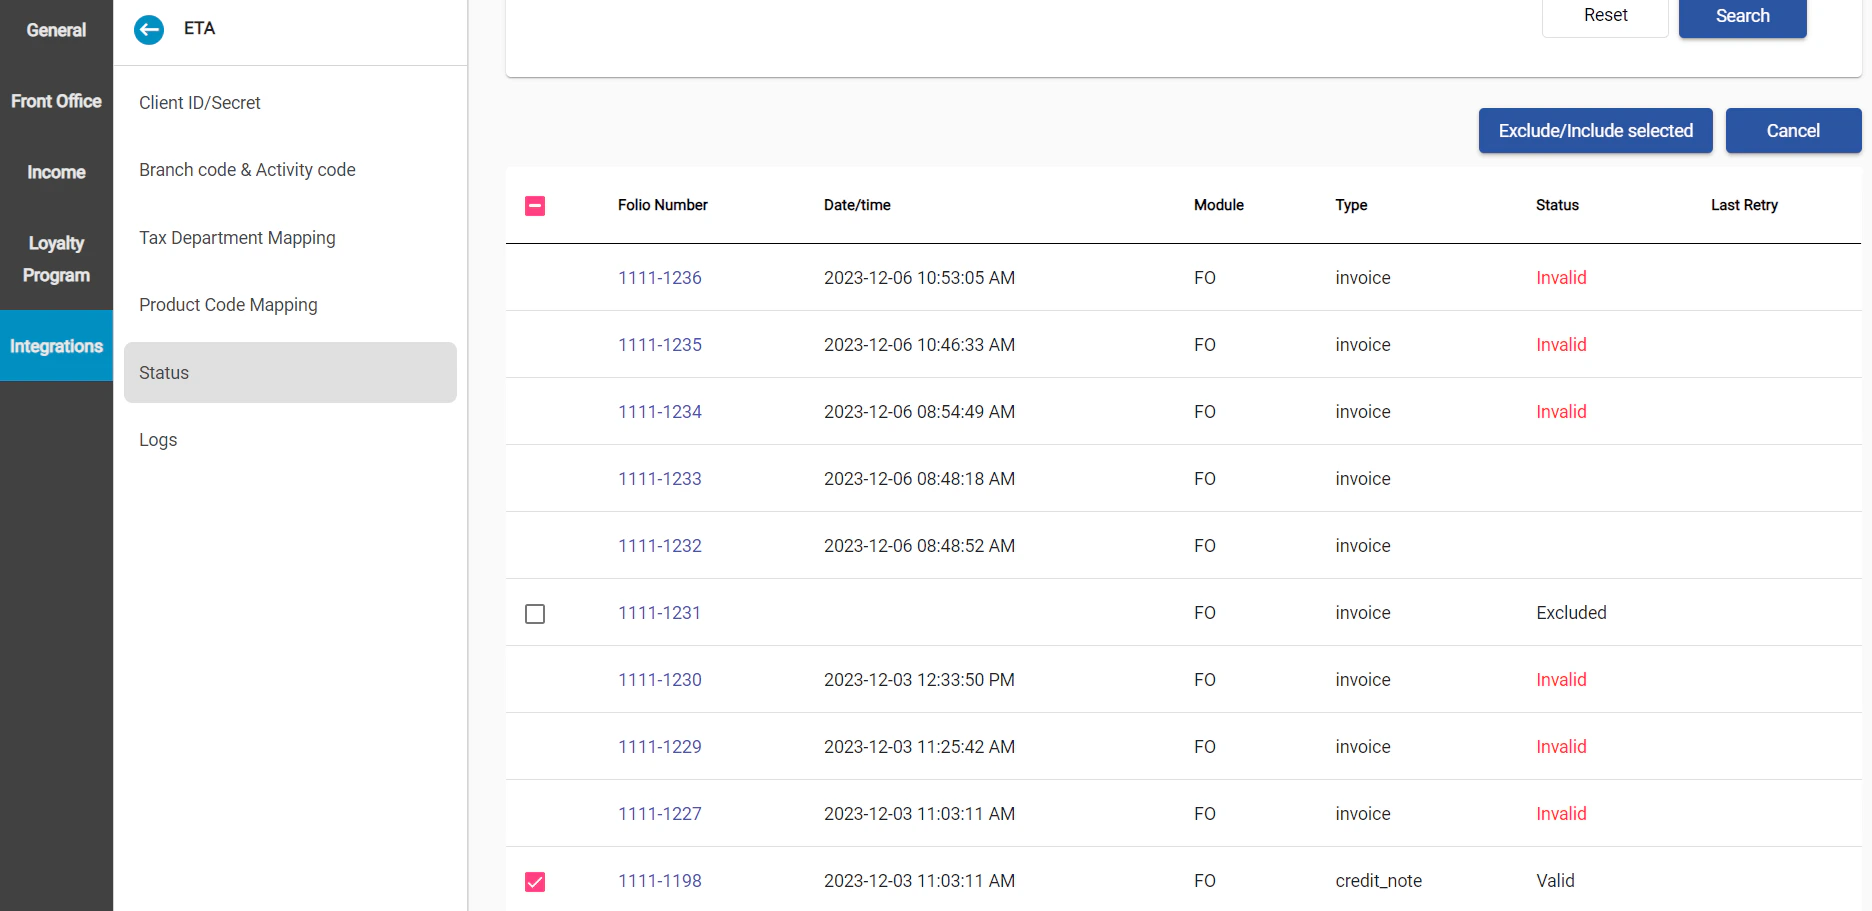
- Rearranged Selection Boxes: We’ve improved the layout of the ETA Status screen by moving the selection boxes to the left side. This change enhances user experience and maintains consistency throughout the interface.
- Default Check for “Excluded” Folios: Upon loading the ETA Status screen, the default selection of “Excluded” folios has been removed. This adjustment ensures a cleaner and more focused view, allowing you to make selections based on your specific needs.
- Selection Boxes for “Valid” Folios: We’ve introduced selection boxes for “Valid” folios, providing you with additional control and flexibility in managing these folios effectively.
- “Cancel” Action Button: A new action button labeled “Cancel” has been added to facilitate the cancellation of both “Valid” and “Pending” folios. This streamlines the cancellation process, offering a straightforward approach to managing your folios.
- Folio Exclusion/Inclusion: When you select a “Valid” folio for cancellation, the “Exclude/Include” action will appropriately update its status to “Excluded” and vice versa. This functionality ensures accurate and efficient folio management.

- Credit Note Generation: Upon the cancellation of applicable folios (“Valid” or “Pending”), a credit note is now automatically generated within ETA. This process occurs seamlessly, with no changes required on our system.
- Update Folio Status to “Cancelled”: Valid cancellation credit notes will now update the corresponding folio’s status on our system to “Cancelled,” maintaining accurate and synchronized information.
- Prior Adjustments Validation: A new validation has been implemented to prevent the cancellation of folios with prior adjustments. If an attempt is made to cancel such folios, a message will be displayed: “The selected folio(s) [Folio numbers] are adjusted or not valid and can’t be cancelled.”

- Canceled folios will have their status updated to “Canceled” once their credit note becomes valid.
-
Users can now resend folios with the status “Internally Canceled.”

- Checkboxes are available in front of pending, excluded, and valid folios. Exclusion actions can be taken on pending and excluded folios, while cancellation actions can only be taken on valid folios.
November 27, 2023
Updates to Transfer and Usage Lists
We Made some enhancements in our BackOffice Inventory module, specifically in the “Store Transfer List” and “Usage List” These updates aim to improve efficiency and provide a more seamless experience for managing transfers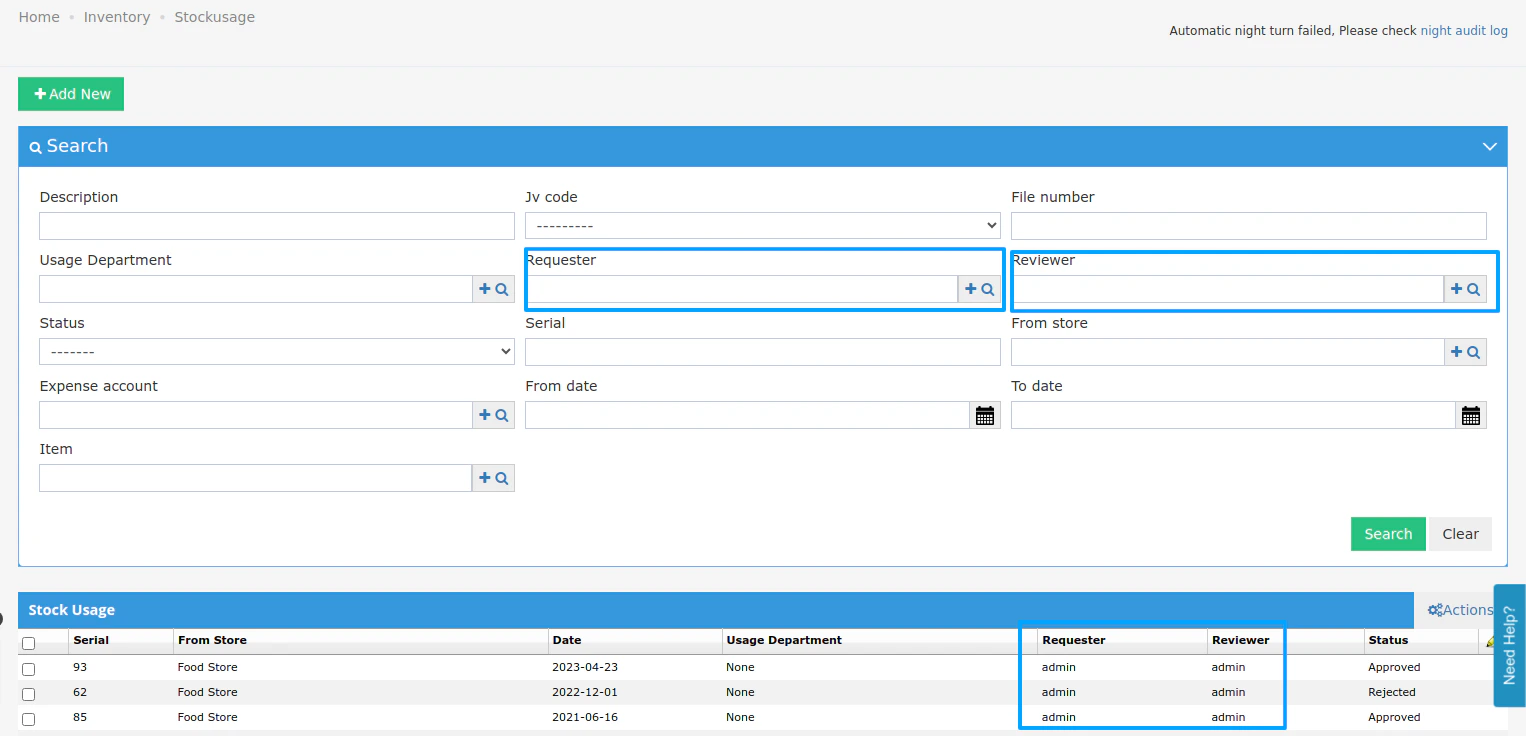
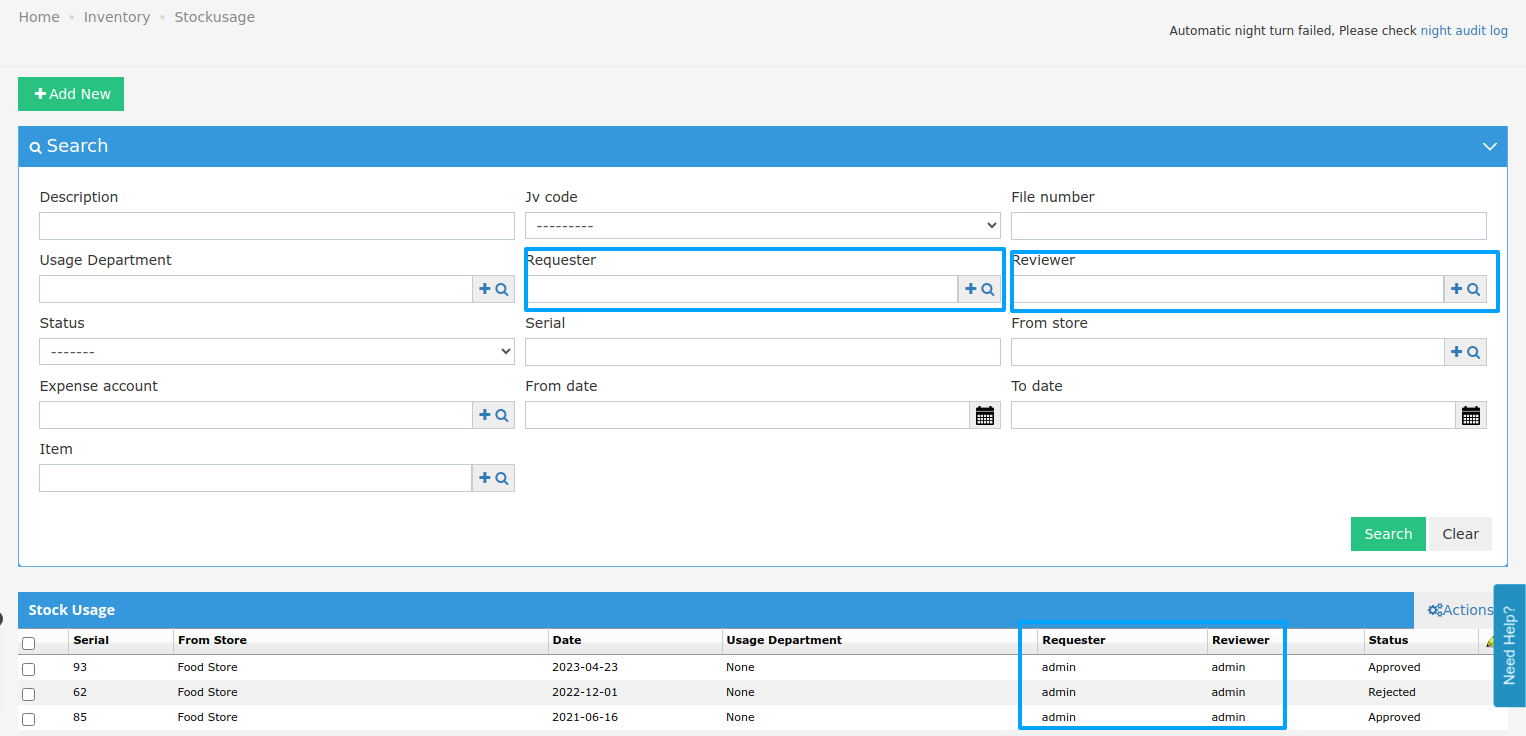
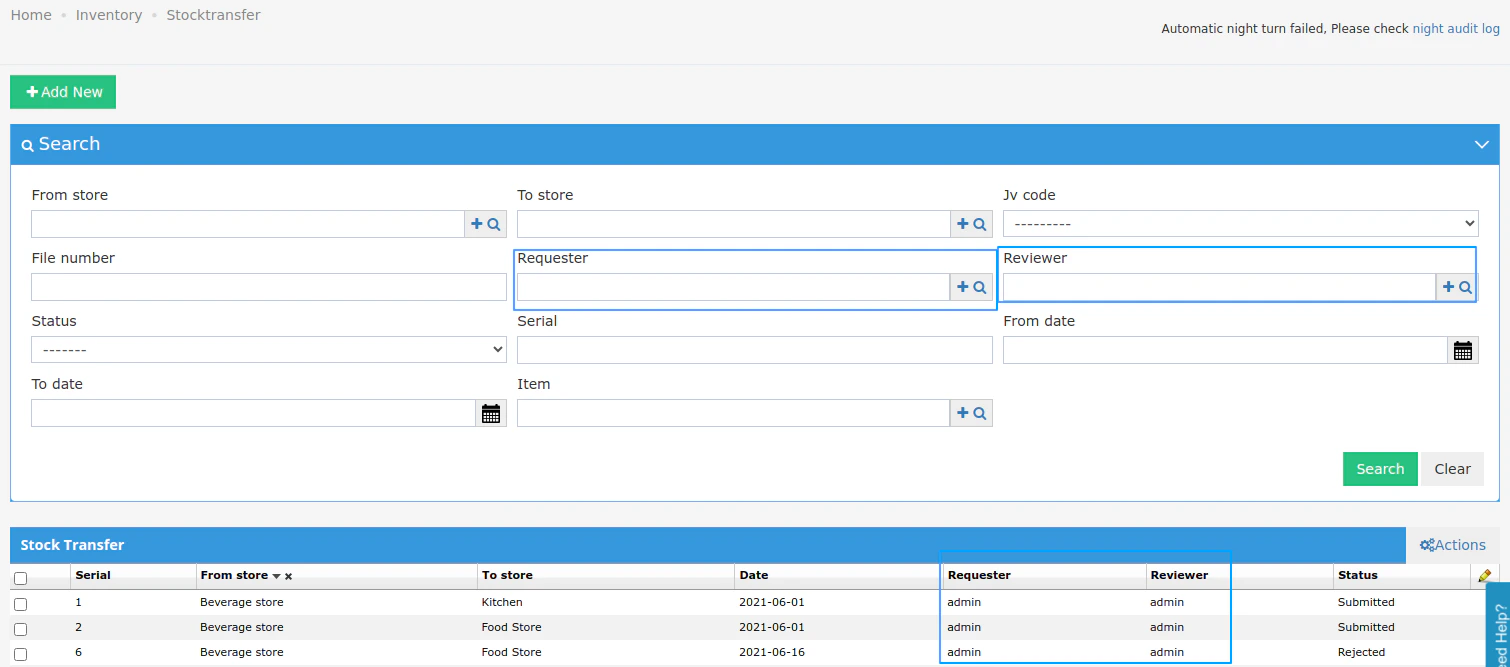
 Enhancements Include:
- Requester Column:
- A new column, “Requester,” has been added to the transfer list.
- This column displays the creator of the transfer, saving you time from having to open each request individually.
- Reviewer and Requester Fields:
- The “Reviewer” and “Requester” fields have been enhanced to include autocomplete functionality.
- This improvement streamlines the process of selecting reviewers and requesters, making it quicker and more user-friendly.
How to Use:
- Viewing Requester Information:
- Open the “Store Transfer List” in the BackOffice Inventory module.
- You will now see a new column labeled “Requester,” displaying the creator of each transfer request.
- Autocomplete for Reviewer and Requester Fields:
- When creating or editing a transfer request, the “Reviewer” and “Requester” fields now support autocomplete.
- Start typing the name, and the system will suggest matching options, saving you time and ensuring accuracy.
Updates To Import / Export Departments
we’ve introduced some valuable changes to the Import and Export functions within the “Front office Settings → Departments → Import departments ”. These changes aim to provide you with more control and flexibility in managing department data. Let’s dive into the details!We added Export so you can export current departments and Edit then Importing
When exporting department data, you now have additional columns to capture more details about each department.Columns Included:- Statistics Type:
- Represents the Statistics Type for each department.
- Expected values: Statistics Type saved on the system
- [Debit] Tax Definition Code:
- Represents the Tax Definition applicable for debit departments.
- Expected values: Tax definition saved on the system
- [Debit] Tax Definition Start Date:
- Represents the start date for the Tax Definition.
- Applicable only for debit departments.
- Mandatory if a [Debit] Tax Definition Code exists.
- Expected values follow the date format yyyy-mm-dd.
- [Debit] Tax Definition End Date:
- Represents the end date for the Tax Definition.
- Applicable only for debit departments.
- Mandatory if a [Debit] Tax Definition Code exists.
- Expected values follow the date format yyyy-mm-dd.
- The end date should be later than the Tax Definition start date.
Google analytics online booking integration Update to G4
We Updated our Google Analytics online booking integration Update to G4To add your new Google Analytics G4 ID just send it to your account manager will add it to your online bookingNovember 20, 2023
Printing CIB Cheques directly from Kwentra
Printing CIB Cheques directly from KwentraTo empower our users with the ability to print cheques seamlessly, we’ve introduced a simple feature in our BackOffice system. Follow these steps to use the feature:Step 1: Navigate to Vendor Settings- Access BackOffice and go to Settings.
- Choose Add/Edit Vendor.
- Look for the newly added field, “Legal Name,” in the Vendor definition.
- This field is optional and has a character limit of 100.
- Feel free to use Arabic or English characters as needed.
- Printing Cheques in Accounts Payable Vendor payment
- Head to BackOffice and navigate to Accounts Payable.
- Select Print Cheques.

- The new screen displays mandatory fields with no defaults.
- Cheque value date (Choose a date)
- Vendor legal name (Enter up to 100 characters)
- Amount (Enter a positive float)
- Template (Select from the dropdown list)
- Save your entries with Save, Save, and Edit, or Save and Add.
- After saving, notice the appearance of the “Print” button.
- Clicking it opens a print dialog with a forced landscape orientation.
- The amount is automatically written in English.
- Follow the note: “Please use the adjustable printer tray, and the Logo should be on top of the page.”
- After saving, a “History” button appears.
- The search functionality lets you filter results based on cheque value date, vendor legal name, template, and more.
- Review the results list, including crucial details like cheque value date, vendor legal name, amount, template, vendor, Vendor Payment ID, and the creator’s username.
- Printing Cheques from vendor payment
- Navigate to vendor payment
- From the Print Cheques screen, click the “Print Cheque” button.
-
- The new screen in “Add New” opens, and all fields are automatically filled.
- If the legal name in the Vendor is empty, the system will use the Vendor name.
November 19, 2023
Enhanced Bulk Printing for AR Invoices!
We have made some changes to the Bulk Print feature for AR Invoices.Here’s what’s new:- Header and Footer Inclusion:
- Each invoice in the Bulk Print will now include a clear header and footer, ensuring a professional and polished appearance.
- Page Break After Each Invoice:
- Enjoy improved readability with a page break after each invoice, making it easier to navigate through your printed documents.
- Grand Total on a Separate Page:
- The Grand Total section now resides on a separate page, providing a comprehensive overview without the distraction of headers or footers.
- These changes are applicable for the “Detailed” and “KSA Legal” templates only.
- The Grand Total is displayed distinctly on a separate page, maintaining a clean and organized presentation.
November 18, 2023
Back Office - AR Payment - Adding AR payment comment to Invoice splitting JVs
To enhance tracking we added the AR payment comment in the JV generated from splitting the amountNovember 16, 2023
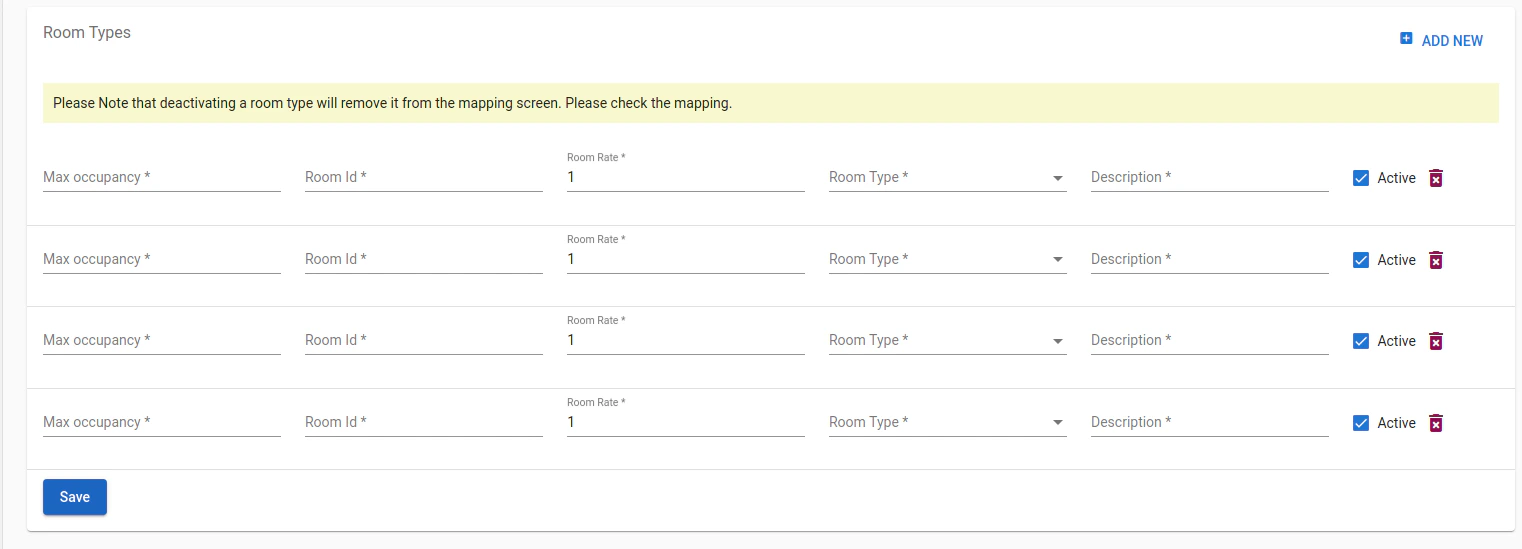
Enhanced Block Selection Feature for Individual Reservations
Introduction:We made enhancements to simplify the process of adding a block to individual reservations. The new Block Selection feature allows you to effortlessly allocate a block and select your preferred room type directly from the reservation screen.Step-by-Step Guide:Step 1: Navigate to the Individual Reservation ScreenStart by logging into the reservation system and accessing the individual reservation screen.Step 2: Explore the Enhanced Block Lookup GridLook for the updated grid in the block lookup section. This grid has been redesigned to make block selection more intuitive and user-friendly.Step 3: Choose the Right BlockIn the enhanced grid, you’ll find open blocks for both tentative and definite pickups. Explore the availability for each block based on room types. Availability numbers are links, except for zero allocations, which are not clickable. If a block is for free sale, it remains selectable.Step 4: Selecting Your Room Type Click on the availability link for the room type you prefer. This action will seamlessly:
- Add the selected block to your reservation.
- Include the chosen room type in your reservation.
October 30, 2023
Introducing Housekeeping Discrepancy Status Feature
Introduction
Our latest software update brings an addition to your hotel’s housekeeping operations—the “Housekeeping Discrepancy Status” feature. This guide will walk you through the steps on how to effectively use this feature to manage and track discrepancies.Accessing the Housekeeping Discrepancy Status Settings Page
- Navigate to Settings -> Front Office -> Housekeeping -> Housekeeping Discrepancy Status.
- You’ll land on the list page where existing statuses are displayed.
Managing Existing Discrepancy Statuses
- Search Functionality:
- Use the search bar to filter discrepancy statuses based on their descriptions.
- Description Field:
- The “Description” field is a string with a maximum limit of 50 characters.
- Search and Clear Buttons:
- Use the “Search” button to initiate the search process.
- Clear the search by using the “Clear” button.
- Add New Discrepancy Status:
- Click the “Add New” button to open the “Add New Housekeeping Discrepancy” page.
Adding a New Housekeeping Discrepancy Status
- Navigate to the “Add New Housekeeping Discrepancy” Page:
- Click the “Add New” button on the list page.
- Fill in Details:
- Enter a unique description in the text field (max 50 characters).
- Save:
-
Save your new discrepancy status.

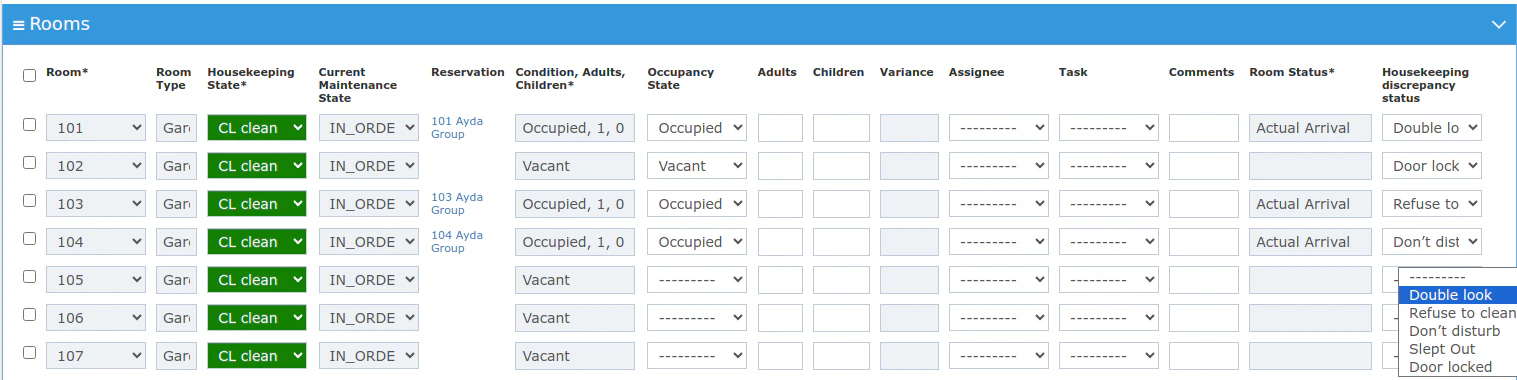
Applying Discrepancy Status to Rooms in the Housekeeping Screen
- Navigate to Front Office -> Housekeeping.
- Locate “Housekeeping Discrepancy Status” Dropdown:
- In each room, find the new dropdown field.
- Choose the applicable discrepancy status from the dynamically populated list.
- Bulk Editing:
- Apply the same status to multiple rooms for efficient bulk editing.
- Data Reset:
-
Note that the data in this field will be reset during the nightly run.
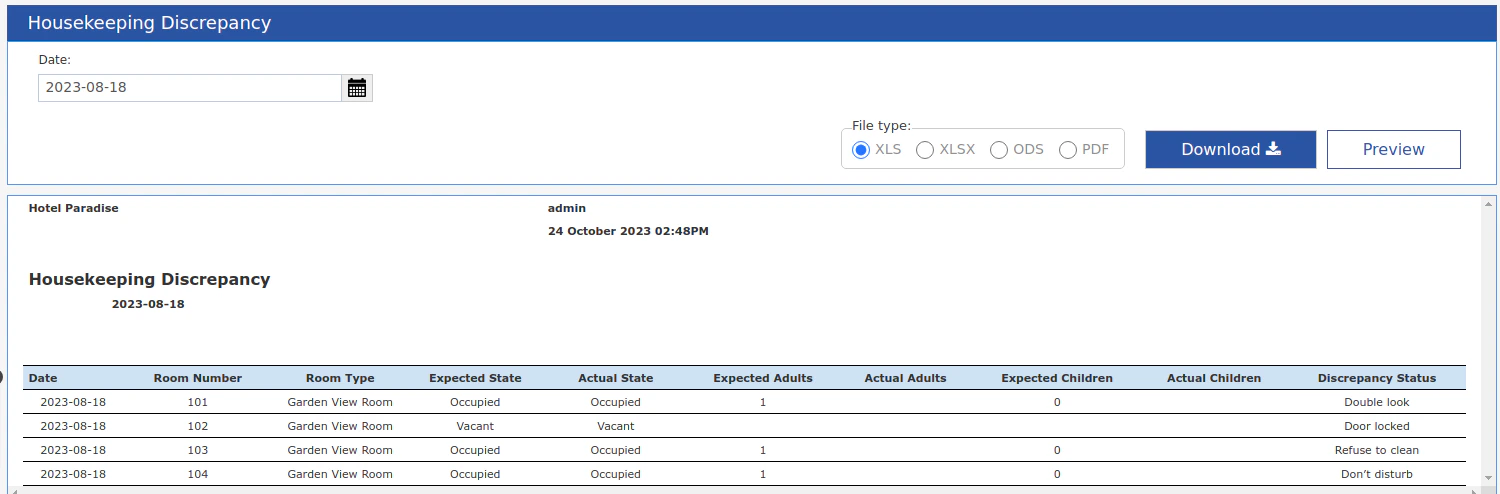
Viewing Discrepancy Status in the Housekeeping Discrepancy Report
- Navigate to Reports -> Housekeeping -> Housekeeping Discrepancy.
- New Column: “Discrepancy Status”:
- A new column will appear after the “Actual Children” column.
Exclude Invoices From Being Submitted to ETA E-Invoicing
Integration Update: you can now choose the invoices that you don’t want to send to ETA e-invoiding before the system automatically sends them to the portal.October 16, 2023
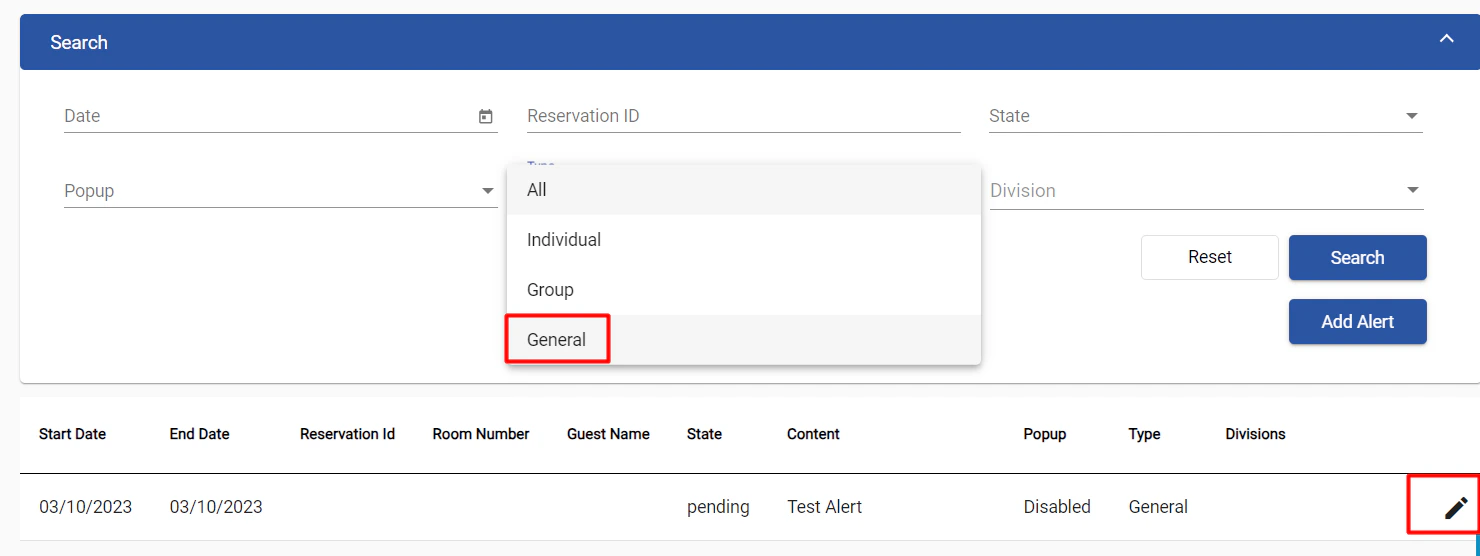
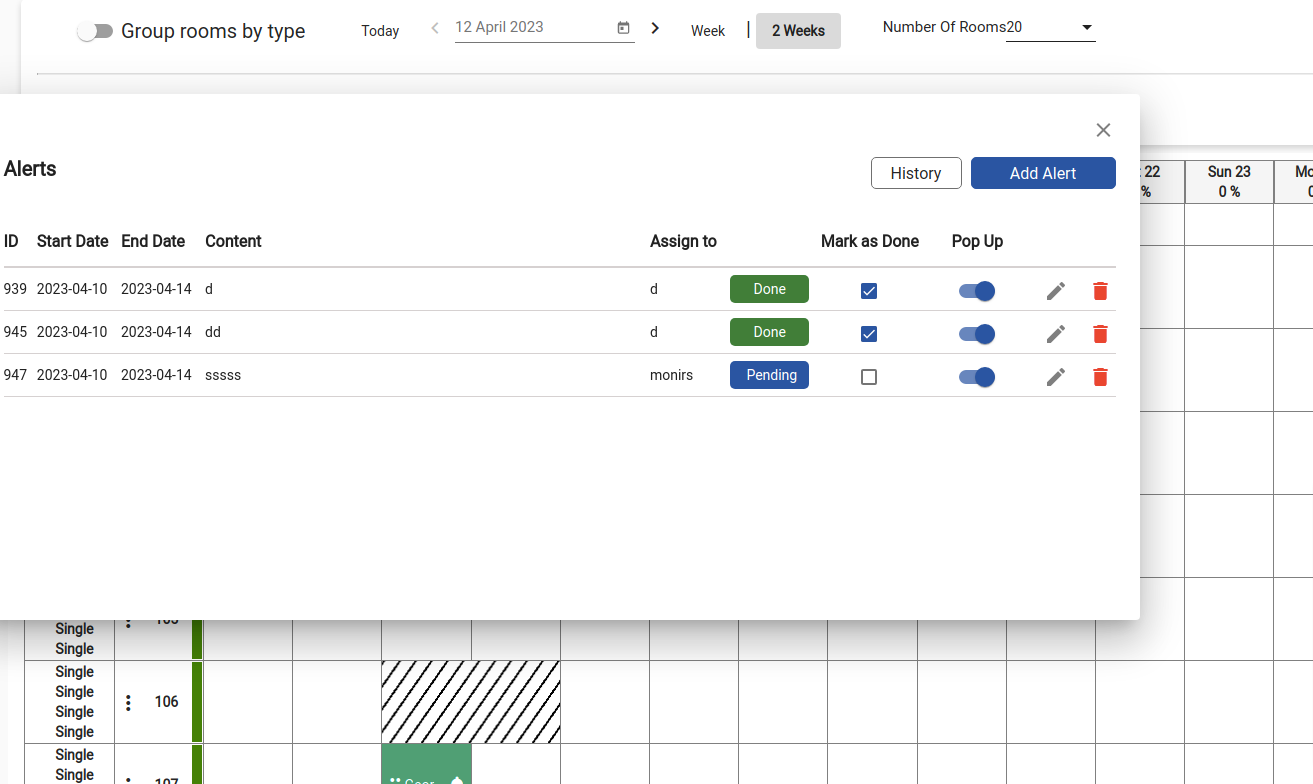
General Alerts
General Alerts (Traces) can now be created directly from the Alerts listing screen in Front Office.These alerts will not be linked or related to any reservations (individuals or groups) and can be assigned to the desired division.To create a new general alert, go to Front Office - Alerts, then click on Add Alert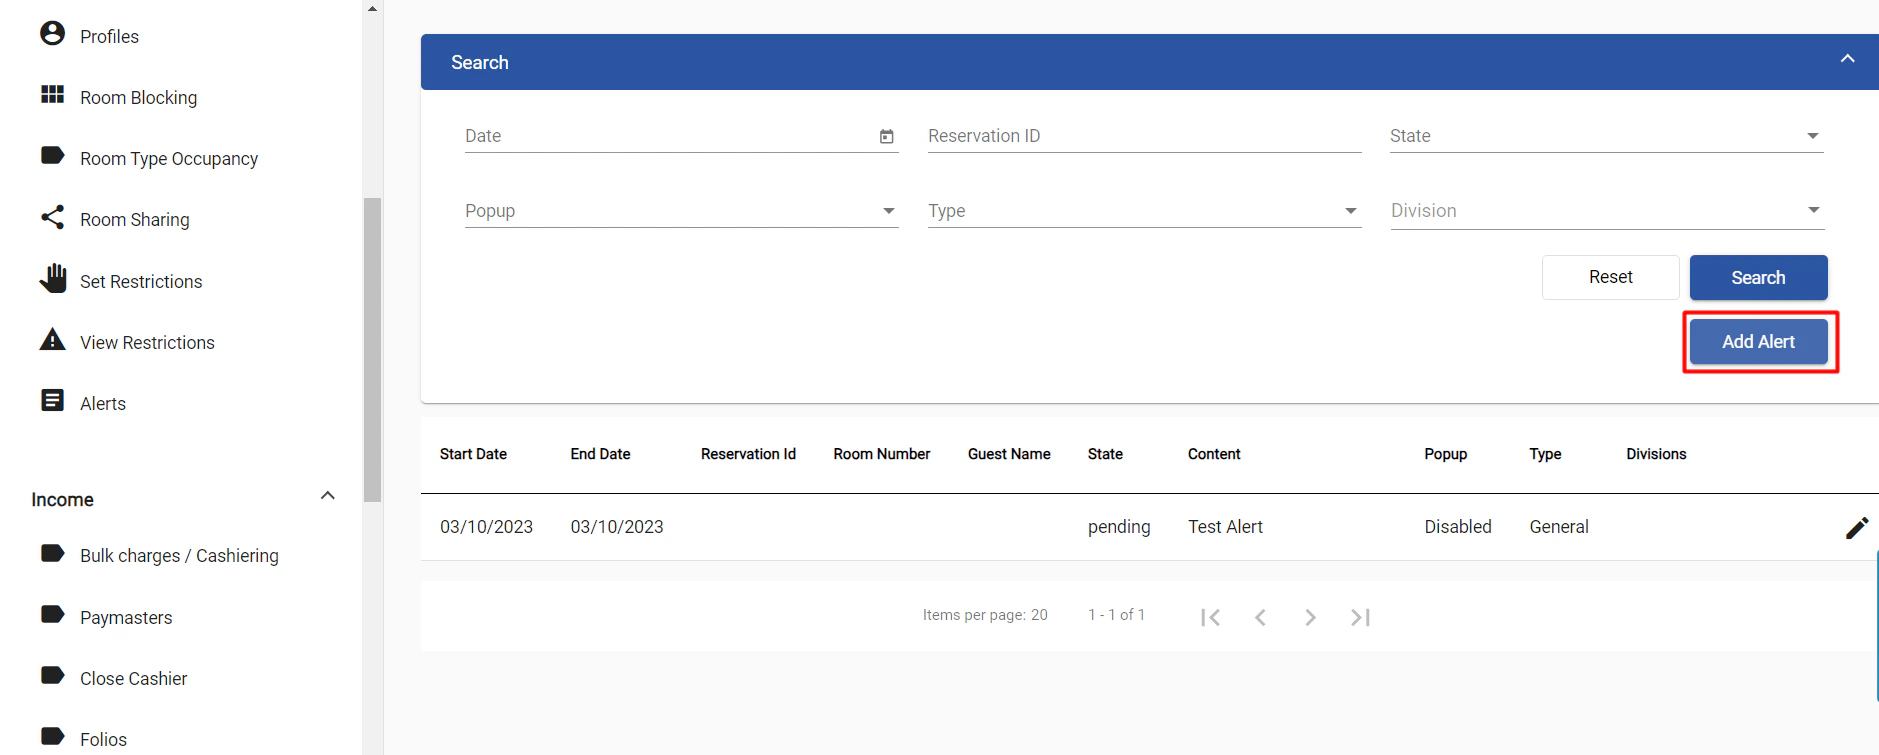
October 10, 2023
Generate Payment Links using kwentra Pay.
Integration update: generate shareable payment links directly from your front office billing screen to send to your guests for advance payments collection.October 4, 2023
Adding the ability to edit exchange rate during AR payment
Back Office → Accounts Receivable → AR Payments.We are introducing a practical enhancement to our AR payment feature, Now you have the ability to Edit Exchange rate freely during AR paymentKey Features:- Editable Exchange Rate: Now, users can edit both the foreign amount and exchange rate fields when dealing with foreign currency departments.
- Dynamic Base Amount: The base amount field adjusts dynamically, reflecting the foreign currency amount and the manually entered exchange rate.
- Default Exchange Rate: The exchange rate field comes pre-filled with the current system exchange rate, maintaining continuity with the current behavior.
- Permission-Controlled Editing: Only users with the “Can Edit AR Posting Currency Exchange” permission can modify the exchange rate, adding an extra layer of security.
- Go to Back Office → Accounts Receivable → AR Payments.
- Choose a foreign currency credit department.
- Edit the foreign amount and exchange rate fields as needed.
- The base amount adjusts automatically.
- Only users with permission to edit the Can Edit AR Posting Currency Exchange
Additional Fields in Journal Voucher Search
Back Office → General Ledger → Journal VoucherYou can now search the Journal Vouchers with File Number and description, the new field have been added to the JV search sectionEnhancing ETA Integration with Arrival and Departure Dates
We’ve modified the ETA integration to include critical reservation information. Now, the arrival and departure dates of each reservation are sent to ETA and can be viewed under “Sales Order Description” field in ETA portal. This improvement allows for a more detailed representation of reservation data in ETA. Special Cases:- Paymaster Folios:
- Paymaster folios will be sent as is, without the “salesOrderDescription” key.
- AR Folios Linked to Reservations:
- AR folios linked to reservations (and not paymasters) will be sent with the “salesOrderDescription” key, incorporating the arrival and departure dates.
September 29, 2023
AR Accounts - Transfer posting directly from on hold window
[Back Office → Accounts Receivable → AR Account → On hold window](https://manage.kwentra.com/pos/cashiering/invoice/)In response to user feedback, we are introducing a practical enhancement to our AR Accounts – the ability to transfer posting is now available from the on-hold window.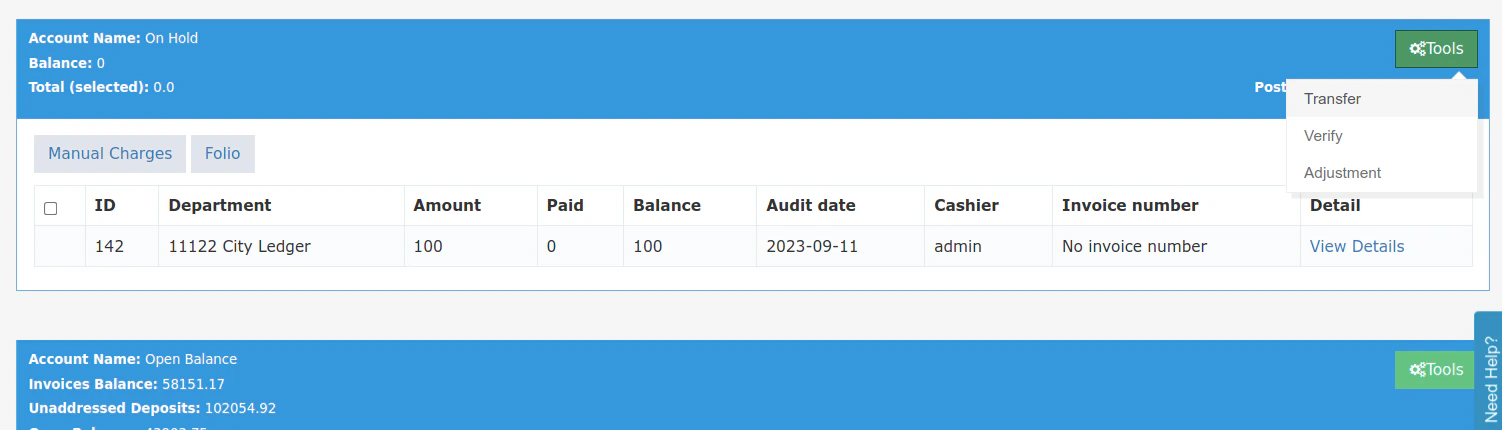
- Historically, transferring postings within Accounts Receivable was only possible through the Open Balance window
- Now it can be done from the On-hold window
- This can help in rectifying mistakes that happen in adding the wrong profile from the Reservation screen. before generating the invoice by verifying the posting
Updates to POS Pay to room feature
POS -> InvoiceIn response to user feedback, we are introducing a practical enhancement to our POS – the ability to see Closed To POS rooms in your invoices. and adding Here’s what you need to know:- Closed To POS rooms that were previously excluded from the Room Number drop-down list will now appear in the customer section of the invoice with a locked icon to indicate that the room is closed to POS and the user cannot make a room payment on it
-
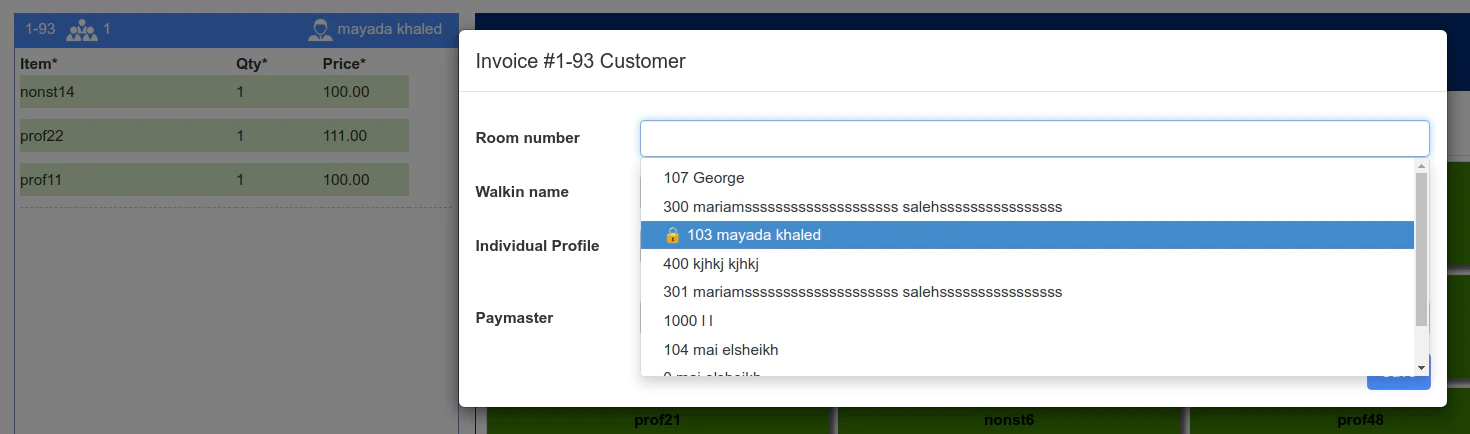
- However, the user will be able to select the room and add it to the invoice but the system will not allow payment on it
- We also added the ability for our users to add the room to the invoice from the payment dialog directly

September 24, 2023
Ability to Transfer “On Hold” Postings from one Account Receivable to another
In any Account Receivable in Kwentra PMS you have 2 windows; On Hold and Open Balance.Now you can select one or more posting(s) from the On Hold window of a selected Account Receivable and Transfer it to another Account Receivable.This action allows you to fix any error that might have happened when created the Account Receivable payment with ease.Cancel No Show Reservation - Ability to set the reservation state to “Expected” or “Checked In\
Whenever a reservation’s arrival date passes while the reservation is “Expected”, the system automatically sets the reservation to the state “No Show”. In case the guest shows up the following day, the system allows you to “Cancel No Show” which used to automatically set the reservation’s state to “Checked In”.Now you have the option to set the reservation state when changing the state of a now show reservation from the field “Reservation State”. The available options are “Expected” or “Checked In”.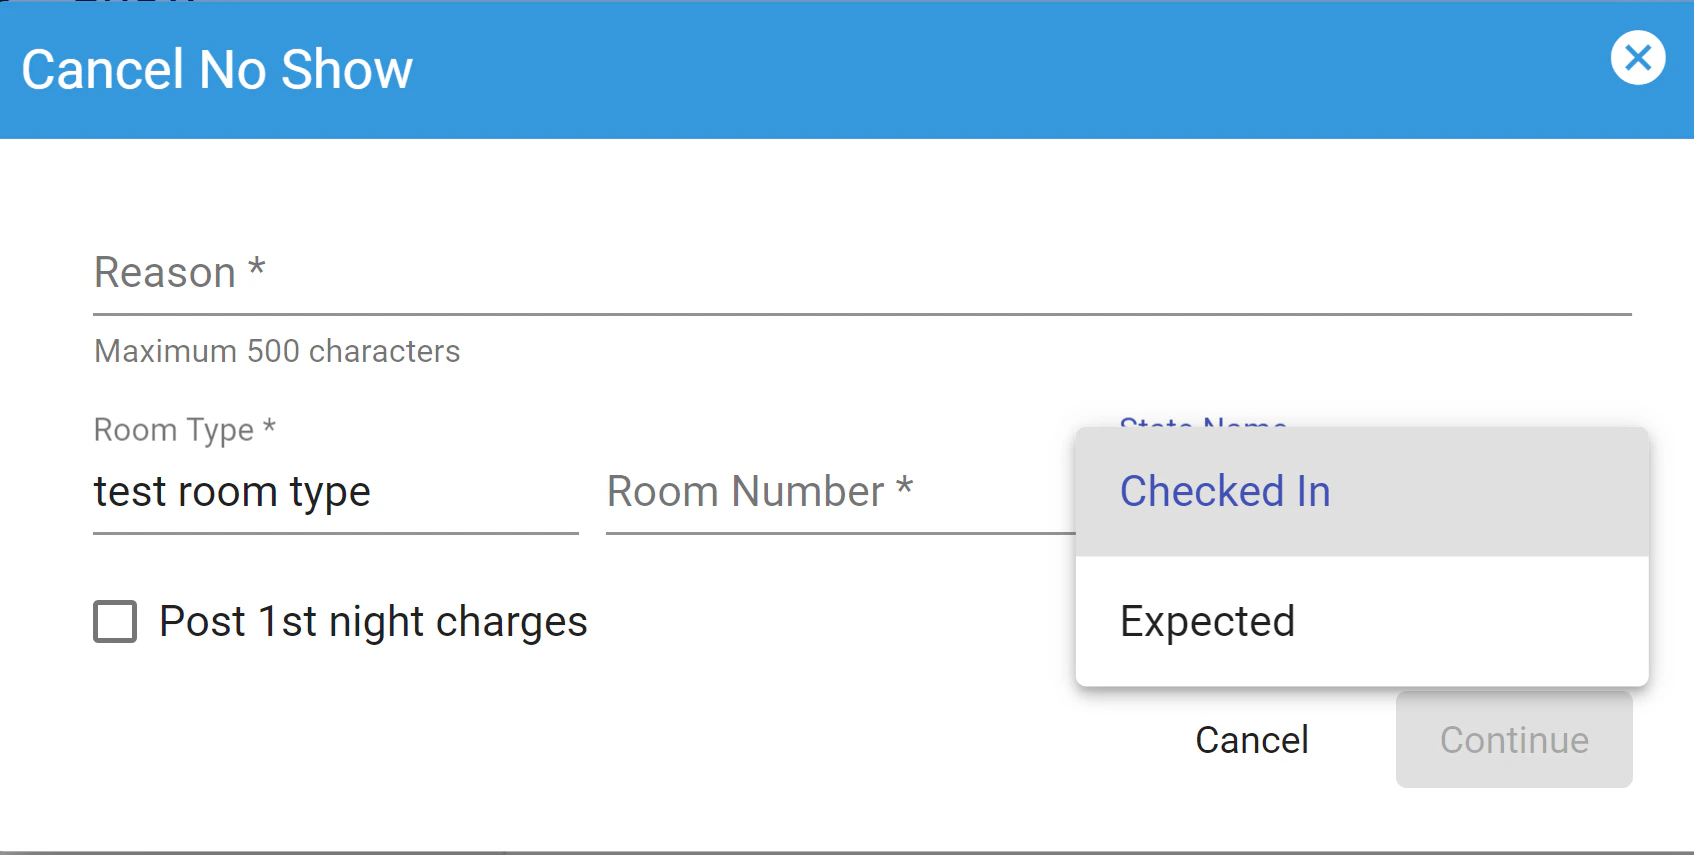
Indicator for multiple windows on Individual Reservation or Paymaster Billing Window
Kwentra PMS allows you to create unlimited number of billing windows on a selected Individual Reservation or a Paymaster. The billing windows allows you to link charges to different profiles or to split the charges according to the guests’ requirements.Normally only 2 windows are displayed within the billing screen. You have the ability to select any other window from the dropdown list field that has the window name. There was no indicator if the billing has more than 2 windows.Now we have added a red outline in case more than 2 windows are linked to the same billing screen. This is to easily identify in case more windows need to be settled before checking out the reservation or closing the paymaster profile.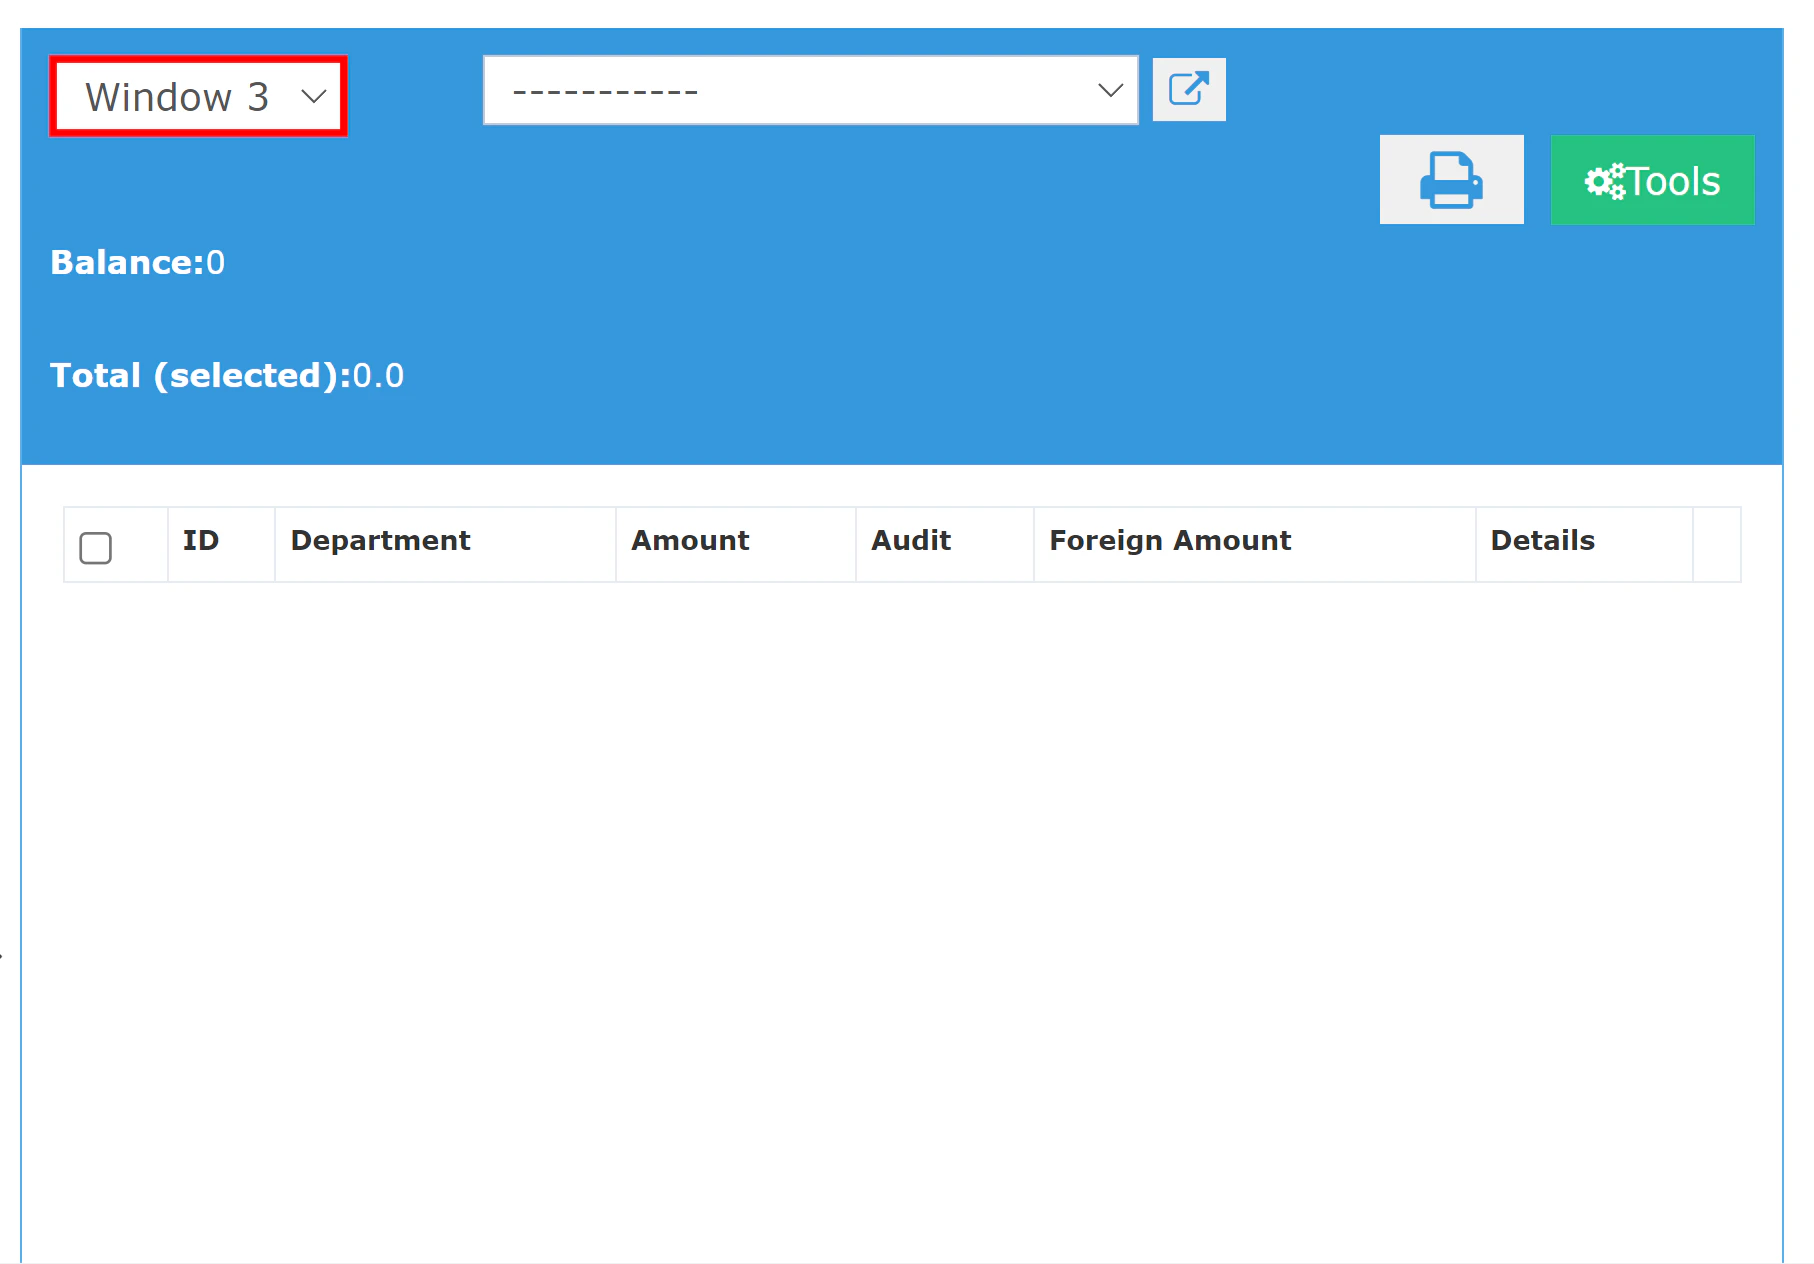
Kwentra Pay - Kashier Integration
What is Kashier and what do they do?Kashier is an infrastructure technology enabler providing payment solutions to empower digital financial service providers across Africa and the Middle East through innovative mobile wallet technology that gives the institute’s clients access to finance and digital payments.Simply, linking Kashier with kwentra PMS will help you collect your reservations payments based on the deposit policies you desire in order to enforce your cancellation and no show policies.Generate a payment link with the amount to communicate it to you guest:In that way you can collect payments in advance for reservations made over the phone or through social media, once you generate the link with the amount you desire you can copy it and send it to your guest.Once the guest makes a successful payment, a posting will be created automatically with the paid amount on the corresponding billing window. How does the integration work?All you need to do is contact support@kwentra.com and inform them that you’re interested in activating kwentra Pay.
- Kwentra will initiate the communication with Kashier.
- Kwentra will send you Kashier’s contract for signing.
- Kashier will send kwentra and yourself the credentials for your Kashier account.
- Kwentra will link your paymob account to kwentra PMS based on the payment methods “departments” you desire.
September 20, 2023
STAAH integration
New Integration: Kwentra is now integrated with STAAH Channel Manager.How To Create a Hotel on STAAH From Kwentra?First head to your channel manager and Click On Staah, click on Login settingsEnter the hotel code provided by Staah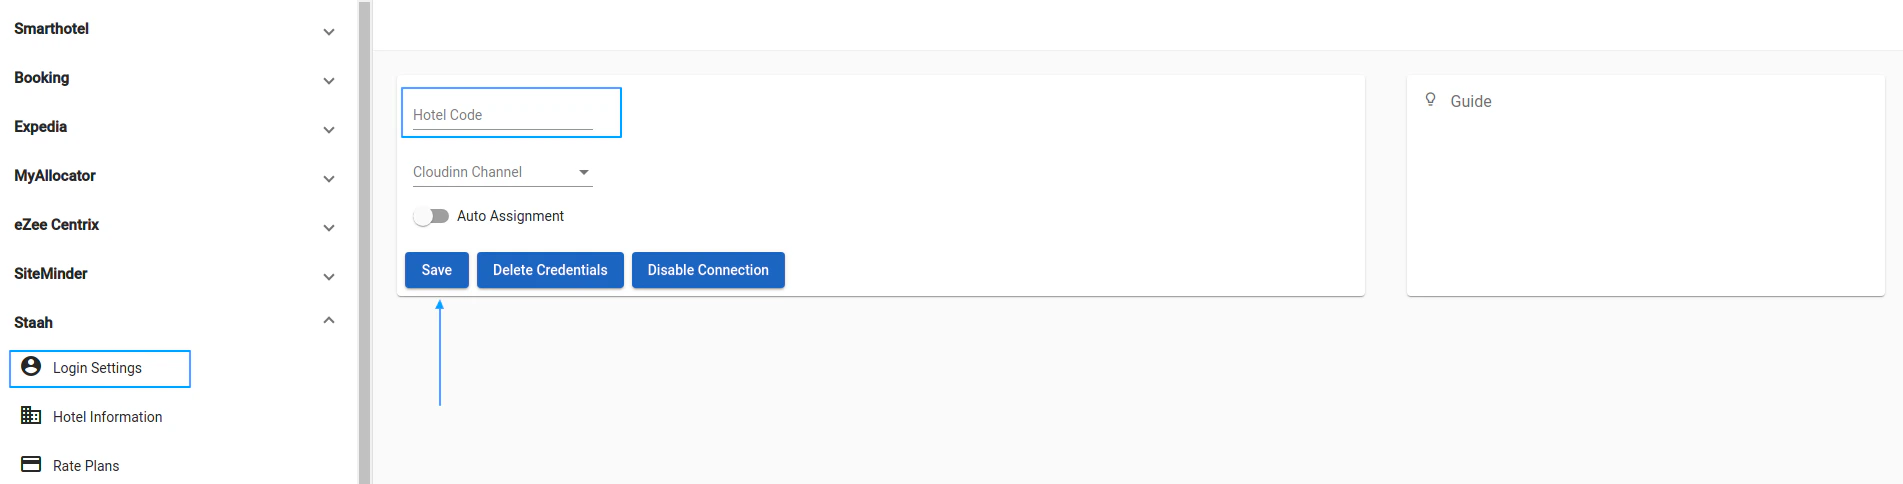
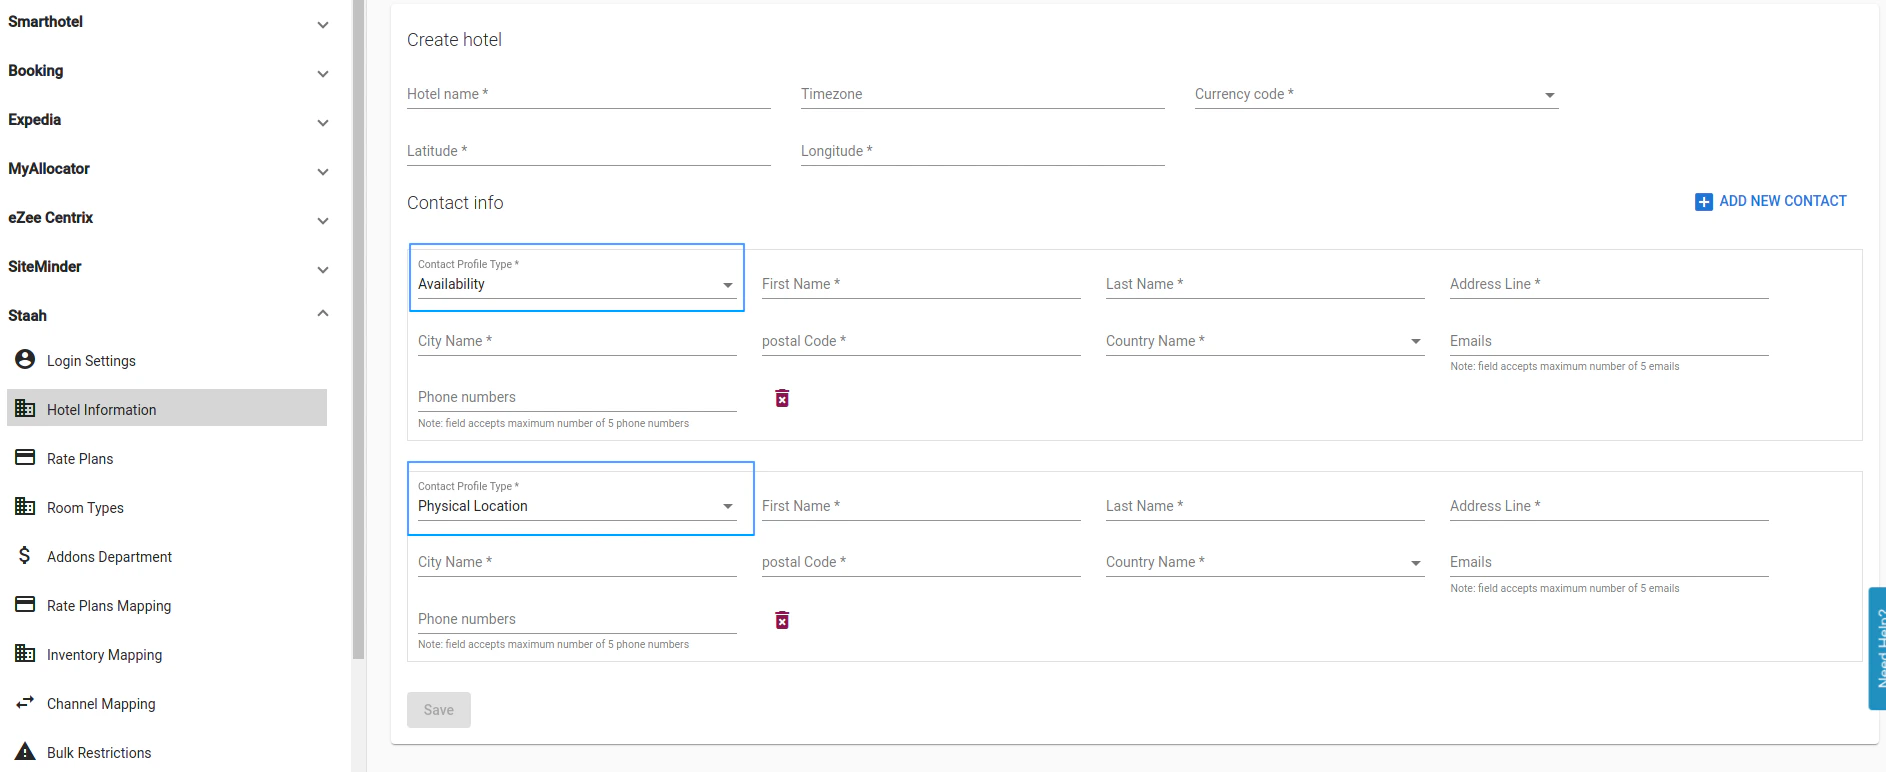
- You have to add 2 contacts, one for Availability and one for Physical location
- Make sure you hit Enter after email and phone to select it
- all the fields are mandatory and have to be entered
September 18, 2023
kwentra & DigitalGuest New Integration
New Integration: kwentra is now integrated with DigitalGuest, a personalized platform to communicate with the guest before, during and after their stay.Read morekwentra & Opentec Passport Scanner Integration
New Integration: kwentra is now integrated with Opentec Passport Scanner to allow an easy guest profile capture automatically with no manual effort.kwentra & Samsotech Passport Scanner Integration
New Integration: kwentra is now integrated with Samsotech Passport Scanner to allow an easy guest profile capture automatically with no manual effort.September 17, 2023
Ability to Restrict General Ledger (GL) Financial Period
Back Office → Settings → Financial Setup → Ability to Edit GL PeriodKwentra features the ability to set the GL Financial Period as “Restricted” or “Unrestricted”.- Unrestricted period means that all financial operations that took place on a month earlier than the current audit date’s month can be edited or changed normally
- Restricted period means that any financial operation that took place on a month earlier than the current audit date’s month cannot be modified or edited. The system locks all past financial operations in order to allow the financial controller the grip over all transactions that has been revised during the monthly closing.
- Upon turning the night of the current month to the future month, the system adds the current month to the list of “Unrestricted Months” by default. This is to allow the other departments to finish their remaining financial operations within the first couple of days of the new month.
- Upon the monthly closing and after verifying all the monthly finances; the financial controller should browse to the screen and remove the closed month from the list of Unrestricted Months in order to prevent any further updates on it.
- The current audit month and any following future month are Unrestricted by default and cannot be restricted.
September 10, 2023
Enhancing Manager Report - Including Non-Hotel Revenue Option
What’s New:1. New Report Parameter: Include Non-Hotel RevenueWe have added a brand-new report parameter titled “Include Non-Hotel Revenue” to the Manager Report. This parameter is set to a default value of “No.”How It Works:When “Include Non-Hotel Revenue” is set to “No”:- The Manager Report will exclude statistics types associated with non-hotel profit revenue from calculations.
- Revenue generated by departments linked to statistics types marked as “non-hotel revenue” will be omitted from the total revenue calculation.
- The Manager Report will include all statistics types, including those related to non-hotel profit revenue.
- All department revenue will be considered in the total revenue calculation, regardless of their link to “non-hotel revenue” statistics types.
- Accessing the Manager Report: Navigate to the Manager Report in the “Reports” section.
-
Using the “Include Non-Hotel Revenue” Parameter:
- Locate the “Include Non-Hotel Revenue” parameter within the Manager Report interface.
- Toggle between “Yes” and “No” based on your reporting needs.
-
Viewing Your Customized Report:
- Your report will now reflect your chosen setting, either including or excluding non-hotel revenue statistics types.
September 5, 2023
Guest Preferences and Room Sharing Indicators in Reservation
Guest Preferences Indicator:- What’s New:
- An icon or indicator has been added next to the guest’s name in the reservation listing screen, also known as the “Guest Name cell.”
- This indicator is displayed only when the selected guest profile has associated guest preferences.
- Hovering your mouse over this indicator will reveal a tooltip that reads “Guest Preferences.”
- What’s New:
- An icon or indicator is now visible next to the room number in the reservation listing screen, specifically in the “Room Number cell.”
- This indicator is displayed when the selected reservation is sharing a room with another guest.
- Hovering your mouse over this indicator will reveal a tooltip that reads “Room Sharing.”
- Guest Preferences Indicator:
- When viewing your reservation listings, look for the “Guest Preferences” indicator next to the guest’s name.
- Room Sharing Indicator:
- When viewing your reservation listings, spot the “Room Sharing” indicator next to the room number.
August 31, 2023
Group Reservation - Allowing Billing Functionalities Through Creating A Paymaster
Path: Front Office → Group Reservations → Select a GroupKwentra now supports all billing features on any Group Reservation. This is made possible through linking the group reservation to a new Paymaster profile.On Group Reservations that are created and not yet linked to any Paymaster, you will find the new button “Create Paymaster Billing”. Upon clicking the button and confirming the informative message you should find a confirmation message with a confirmation number as well as 2 new buttons available within the screen. The 2 buttons are “Proforma” and “Billing”.This action creates a new paymaster profile in the system and links it to the group reservation using the “Confirmation Number”. The paymaster name is the same as the group reservation name with the addition of the confirmation number (example: a group reservation with the name of “Group 1” and the confirmation number of “1234” will have the paymaster named “Group 1 1234” linked to it).
The Paymaster start and end dates perfectly matches the reservation’s arrival and departure dates.
Upon clicking the button and confirming the informative message you should find a confirmation message with a confirmation number as well as 2 new buttons available within the screen. The 2 buttons are “Proforma” and “Billing”.This action creates a new paymaster profile in the system and links it to the group reservation using the “Confirmation Number”. The paymaster name is the same as the group reservation name with the addition of the confirmation number (example: a group reservation with the name of “Group 1” and the confirmation number of “1234” will have the paymaster named “Group 1 1234” linked to it).
The Paymaster start and end dates perfectly matches the reservation’s arrival and departure dates.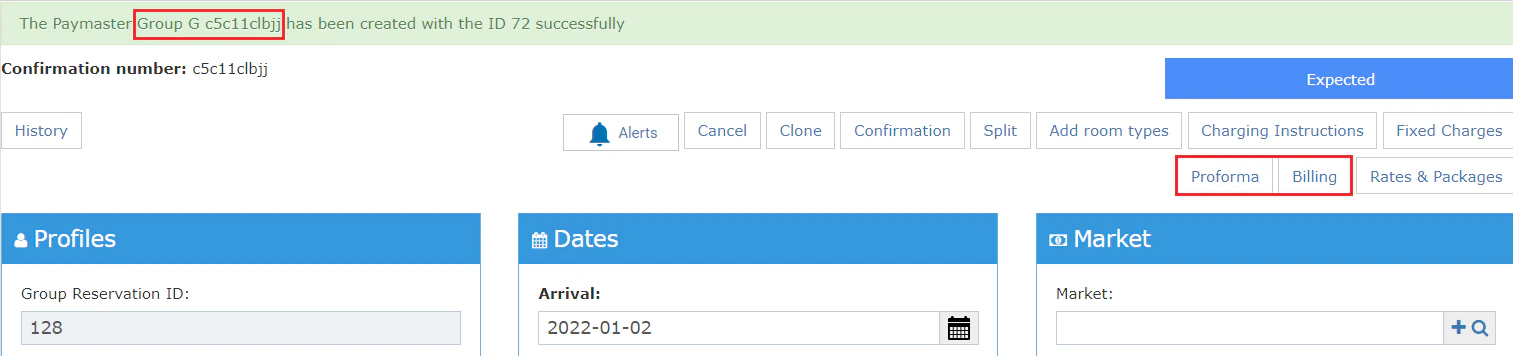
- Feature Insights:
- In case of changing the arrival and departure dates of the reservation, the paymaster dates are updated automatically as well. On the other hand, updating the paymaster start and end dates does not affect the reservation’s dates.
- In case of cancelling the group reservation, the paymaster profile is closed automatically.
- *In case the paymaster profile’s balance was not zero (balanced); The system does not close the paymaster profile automatically and displays a warning message in case of attempting to cancel the group reservation linked to an unbalanced paymaster profile.*The button “Billing” allows you to access that billing screen of the paymaster linked to this group reservation in a pop up. This allows you to manage all billing operations related to the group reservation with ease.
- Create a group reservation
- Click on “Create Paymaster Billing”
- Click on “Billing”
- Add group reservation deposit (by making a payment on the paymaster)
- Close the Billing pop up
- Click on “Proforma”
- Click on Generate
- You should see all predicted charges for the group reservation (even though it’s still expected). You should also see the amount of the deposit made on the billing pop up. You should be able to see the remaining balance of the group reservation.
-
Feature Insights:
- In case of splitting the group reservation, all predicted charges are not calculated anymore as the charges are now moved from the group reservation to the individual reservation(s).
- You can create charging instructions from the group reservation before splitting it (they are automatically applied on each split individual reservation)
- You can create charging instructions from each individual reservation separately after splitting it
- In case of “Adding More Rooms” to the group reservation, this creates a separate group reservation with the same “Confirmation Number”.
- Generating the “Proforma” from one of the linked group reservations will show all predicted charges from all linked group reservations
- Any charges on the linked Paymaster profile will be displayed on all this the linked reservations
- In case of splitting the group reservation, all predicted charges are not calculated anymore as the charges are now moved from the group reservation to the individual reservation(s).
August 28, 2023
August 25, 2023
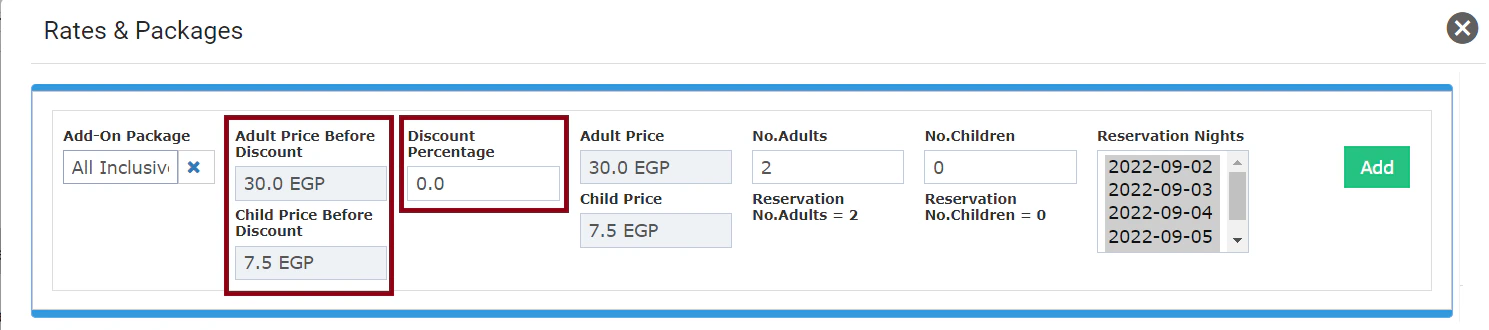
Managing Add-On Packages in Group Reservations
How to Manage Add-On Packages in Group ReservationsAdd-On packages are seamlessly integrated into group reservations, just like they are for individual reservations. Follow this guide to effortlessly manage Add-On packages within group reservations.Step 1: Accessing the Add-On Packages- Navigate to the Front Office
- Choose Group Reservation from the side menu
- Locate the desired reservation and click on it
- After opening the Edit Reservation screen, you will now find a new button labeled Rates And Package. Click on it to manage Add-On packages.
- In the Manage Add-On Packages pop-up, you’ll find an Add-On package field. Begin typing the name of the package you wish to add. This field features an autocomplete dropdown list for convenience.
- Upon selecting the Add-On package, you’ll see details such as the Package Price and Adult Price displayed.
- Package Price: This field shows the value of the package’s price, indicated with the relevant currency. It is visible when the selected package’s type is “Per Reservation.”
- Adult Price: This field displays the value of the package’s price per adult, also with the corresponding currency. It becomes visible when the selected package’s type is “Per Person.”
- The field Discount Percentage allows you to apply a discount to the Add-On package.
- This field is mandatory and should be set to “0.00” by default.
- Ensure your input follows these rules:
- The field cannot be left empty.
- The default value is “0.00.”
- The value cannot exceed 100.00 (percentage limit).
- The value cannot be below 0.
- The Reservation Nights section is a mandatory multi-select list.
- The default selection of nights is based on the package’s configuration:
- For example
- If the package is set to “Apply to all nights,” all nights will be pre-selected.
- If not, only the first night will be pre-selected.
- You can manually adjust the selection according to your preferences.
- Click the Add button after making your selections.
- The system will validate your input.
- Once validated, the package data will be added to the reservation for the selected nights.
- The added package will appear in the Add-On Package Grid, which organizes packages by night in ascending order.
-
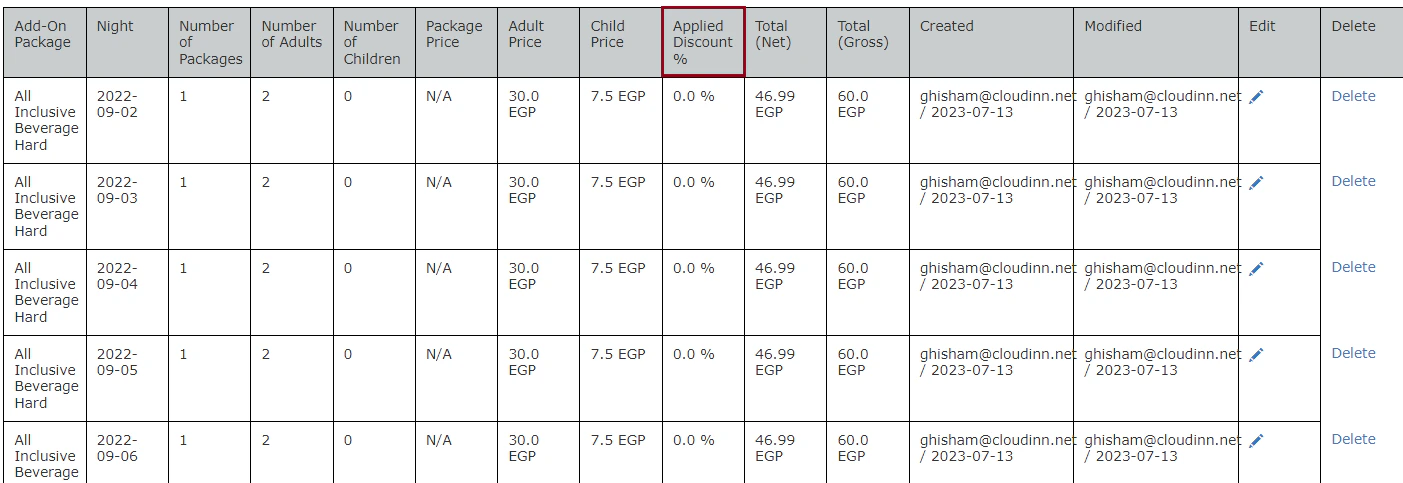
- The Add-On Package Grid displays the added packages with essential details:
- Add-On Package description
- Night
- Package Price
- Adult Price
- Child Price
- Created (user and date of creation)
- Edit Addon package
- Delete button (to remove the package
- Click the Delete button to remove a selected package from the reservation. A confirmation message will appear before deletion.
- Add-On packages are transferred from the group reservation to individual reservations during splitting.
- Edits to group reservation add-ons only impact new split reservations.
-
A warning message will appear if you try to edit or add packages after splitting: “Editing or adding addon packages will only affect the newly split reservations after the edit; any old reservations will not be affected.”
- The Add-On Packages pop-up will be disabled if all reservations are split.
- Add-On Packages are applicable for group reservations with the status “Expected” and partially split.
- The “Apply to all nights” option in the Add-On package definition sets the default night selection, but you can customize it during the Add-On package process.
- All package prices and totals are displayed in their respective currencies.
August 15, 2023
Enhanced “Occupancy by Room Type” Report: Introducing Room Revenue and ADR Columns
Introducing updates to our existing “Occupancy by Room Type” report that will provide you with even more insightful data for your property management needs. In response to your feedback and evolving industry standards, we have enhanced this report to include two additional columns: “Room Revenue” and “ADR” (Average Daily Rate) for each room type. These new features will enable you to make better-informed decisions and gain deeper insights into your property’s performance.1. Introducing the “Room Revenue” ColumnA crucial aspect of evaluating your property’s success lies in understanding the revenue generated by each room type on a daily basis. With the newly added “Room Revenue” column, you can now effortlessly assess the monetary contribution of each room type to your overall revenue. This column will display the revenue value for each room type, providing you with a clearer picture of your property’s financial performance.2. Unveiling the “ADR” ColumnThe “ADR” (Average Daily Rate) is a fundamental metric in the hospitality industry, reflecting the average income generated per room for a given period. We have incorporated an “ADR” column into the “Occupancy by Room Type” report, which calculates and displays the Average Daily Rate for each room type in a separate column. This valuable insight allows you to compare the revenue generated across different room types and optimize pricing strategies accordingly.3. Introducing the “Detailed with Revenue” Detail LevelTo facilitate a comprehensive analysis of your property’s performance, we are introducing a new detail level titled “Detailed with Revenue.” This enhancement enables you to view the “Room Revenue” and “ADR” columns directly within the report. To access these columns, simply set the report column detail to “Detailed with Revenue,” and watch as the data unfolds before you.We understand the importance of retaining the core functionality of the “Occupancy by Room Type” report. Rest assured, this update maintains the existing occupancy details based on different room types, ensuring a seamless transition to the enhanced version.Calculations and PrecisionThe “ADR” calculation is based on a straightforward formula: ADR = Total Net Revenue / Total Rooms Sold for each room type. This calculation method provides a realistic representation of the Average Daily Rate, allowing you to gauge performance accurately.For the “Room Revenue” value, we multiply the number of rooms sold by the average room rate for each room type. This straightforward calculation method offers an immediate understanding of the revenue potential associated with each room type.Both the “Room Revenue” and “ADR” columns are presented with two-digit decimal precision, ensuring that you receive detailed and accurate insights.Read moreAugust 6, 2023
Introducing “Discounts Only” Filter and “Discount Amount” Column in Guest Inhouse Report
We are excited to announce an enhancement to our Guest Inhouse report. The new “Discounts Only” filter and “Discount Amount” column will allow you to focus on reservations with discounts and gain deeper insights into your revenue and pricing strategies. This article provides a comprehensive guide to these exciting changes and how you can leverage them effectively.Changes Overview:- Report: Guest Inhouse
- “With” Option: When you select “With,” the report will filter reservations based on the value of their “discount” field. Only reservations with a discount greater than 0 will be shown. This enables you to specifically focus on reservations that have applied discounts.
- “Without” Option (Default Value): If you choose “Without,” the report will not filter reservations based on the discount value, providing a comprehensive view of all reservations regardless of discounts.
- Access the Guest Inhouse Report:
- Login to your [Your Company Name] account.
- Navigate to the “Reports” section.
- Select “Front Desk” and then choose “Guest Inhouse.”
- Apply the “Discounts Only” Filter:
- Once in the report, locate the “Discounts Only” filter dropdown.
- Choose either “With” or “Without” based on your desired analysis.
- View “Discount Amount” Column:
- Scroll through the report columns to find the rate dropdown controlled section.
- After the discount percentage column, you will now see the “Discount Amount” column, displaying the precise discount amount for each reservation.
Introducing the “Room Type” Filter in “Occupancy by Room Type” Report
We are excited to announce a new update to our “Occupancy by Room Type” report! With this latest enhancement, we have added a powerful filter called “Room Type” to help you gain deeper insights into your occupancy data based on specific room types. This article will guide you through the functionalities of the “Room Type” filter and how it can enhance your reporting experience.Filter Details:- Filter Name: Room Type
- Filter Type: Multiselect Autocomplete
- Mandatory: Not Required
- Select Specific Room Types:
- When using the “Occupancy by Room Type” report, you now have the option to choose specific room types that you want to analyze. Simply click on the “Room Type” filter, and a convenient multiselect autocomplete dropdown will appear, displaying all available room types.
- Select one or multiple room types from the dropdown that you wish to include in your report analysis. The report will generate occupancy data solely for the selected room types, providing you with focused insights into each category.
- Generate Report for All Room Types:
- If you prefer to view the occupancy data for all room types without any specific filtering, leave the “Room Type” filter empty. In this case, the report will be generated normally, encompassing all room types within your property.
Mandatory Add On Packages
We are excited to announce that you can now create a package and set it as “Mandatory”. Packages that are set as “Mandatory” and linked to a rate are automatically added to any reservation that’s linked to the rate.Upon creating a reservation and link it to the applicable rate code. The system automatically creates the Add On Package(s) postings on the applicable nights within the reservation. This is based on the “Apply To” field found within the Package Setting Screen. (Posting Rhythms)You can find the “Mandatory” checkbox in the package settings found on “Front Office → Settings → Packages → Selected Package”Insights on Mandatory Packages:- In case the package setup was per person, the package should be posted for the number of adults and children within the reservation.
- Packages added with the rate automatically should have “system generated“ with true. Otherwise it should have “system generated“ with false
- Upon editing the night data for a given night, the mandatory addon package for this specific night should be edited based on the new night data
- If the rate was removed → remove the package
- If a rate linked to a mandatory package has been added → the new mandatory package is added to the selected night (based on the posting rhythm)
- If the number of adults and children has been updated → update the package data
- Updating the package data that’s already linked to reservation(s) (being set as mandatory or set as non mandatory) does not affect previously created reservations. It only affects new reservations to be created or existing reservations that has any of its nights edited.
- Updating the posting rhythm of the package does not affect previously created and linked reservation packages. It only affects newly created reservations or reservations that has its night(s) created
- Upon updating and saving the package settings → The applied changes would effect the related inhouse and the expected reservations. Kindly note that the “Apply To” and “Mandatory“ changes will be applied on future reservations only and won’t be applied on previously created reservations.
New Room Type Filter Added to “Channel Occupancy by Room Type” Report
The latest update to the “Channel Occupancy by Room Type” report introduces a room type filter, conveniently located in the report parameter screen. This new feature empowers you to further refine your data analysis by filtering the report results based on specific room types. Now, you can easily focus on the occupancy details that matter most to you.How It Works:- Access the Report: To access the modified report, navigate to the “Channel Occupancy by Room Type” section in our reporting tool.
- Set the Room Type Filter: Within the report parameter screen, you will now find the “Room Type Filter” option. Click on it to open the dropdown menu and select the room type(s) you wish to include in the report.
- Generate the Report: Once you have chosen your desired room type(s), click on the “Generate Report” button. The report will now display occupancy data filtered specifically for the selected room type(s).
August 4, 2023
FIAS Protocol User Definable Fields
Integration Update: you can now define certain fields to be communicated to 3rd party services’ tools through FIAS Protocol.Read morekwentra & ReviewPro Integration
New Integration: we’re happy to announce that we’re integrated with ReviewPro to facilitate the data transfer from kwentra front office to ReviewPro.Read morekwentra’s compliance with Montenegro’s legal requirements
New Integration: we are happy to announce that kwentra is now compliant with Montenegro’s legal requirement for front office and point of sale invoices fiscalization through Kraft NT.August 2, 2023
July 19, 2023
Ability to Create Inventory Transfers or Inventory Usages with Dates in the Future
Feature Update:We have applied the following changes to - Store Transfers and Store Usages screens:- Users can now create a Store Transfer or a Store Usage with dates in the future
- Users cannot approve any Transfer or Usage with dates in the future (as this would affect future quantities)
July 13, 2023
Updates to Addon Packages - Add a Discount Percentage & Display Details in the Report “Addon Packages Sales\
Business Value:You can now apply a discount percentage when adding an “Addon Package” to any individual reservation. The discount percentage and the discounted amount are now shown in the report “Addon Packages Sales”How it works?
- Front Office → Individual Reservations → Selected Reservation → Rates and Packages
- Reports → FO → Income → Addon Packages Sales
July 11, 2023
Adding Room Number to Proforma Projected Revenue
Now every projected posting existing within the generated proforma that’s coming from different reservation(s) will include:- Source Reservation → ID
- Source Reservation Night → Room Number
Updates to our Room Rack - Free room upgrades from the room rack
FO -> RoomRackWe added the ability to do free room-type upgrades from the Room Rack- Moving a reservation from one room type to another using drag and drop from the Room Rack will now ask the user if this move is a free upgrade or not
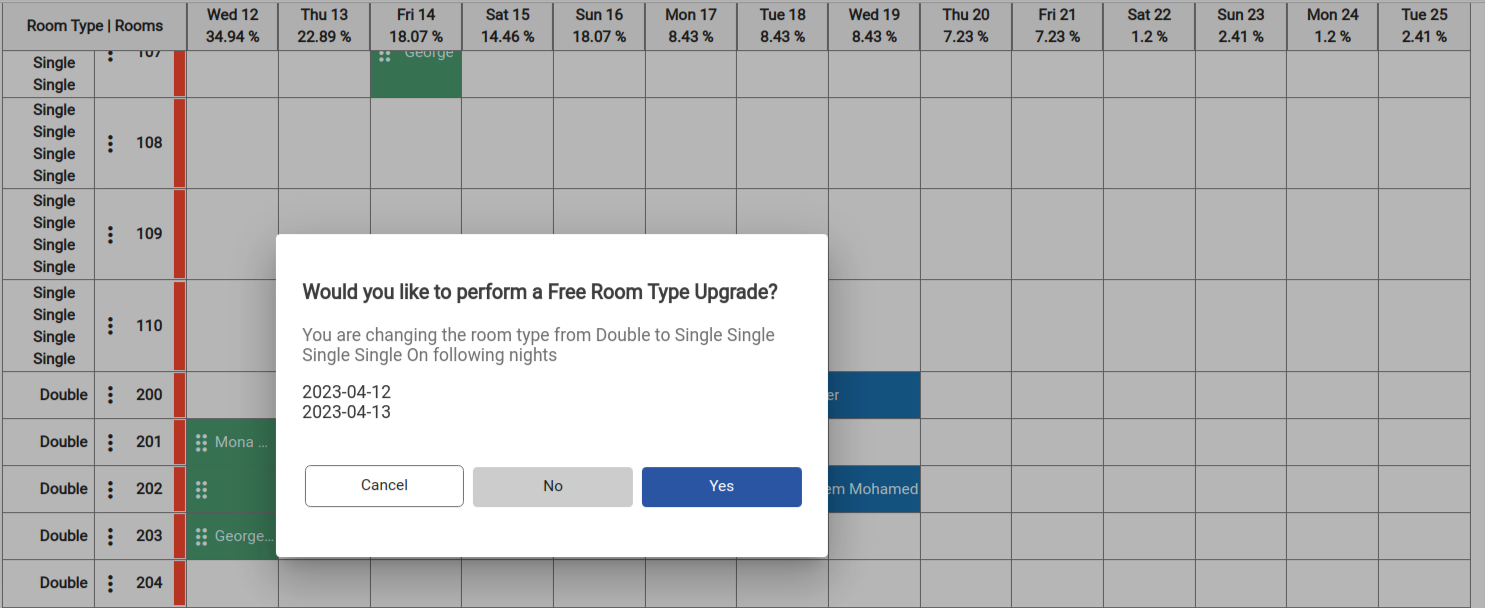
- Also moving the upgraded room to its original type will issue a warning message confirming that this move will remove the upgrade from the reservation

- Please note that:
- reservations with manual rate will not be affected by this change
- revelation with multiple room numbers will not be affected by this change
June 30, 2023
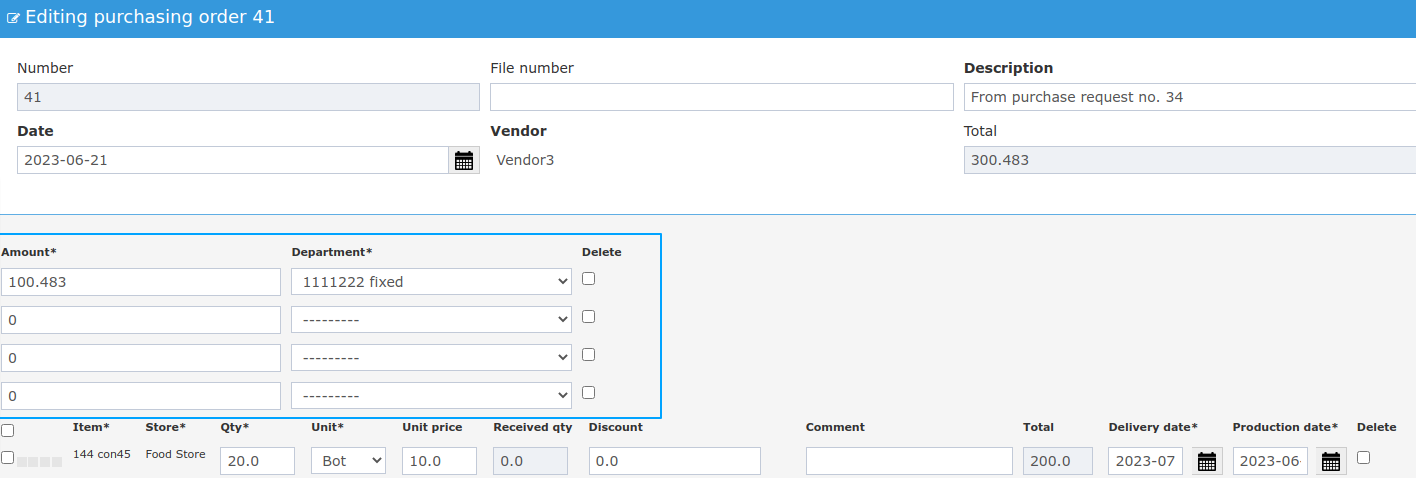
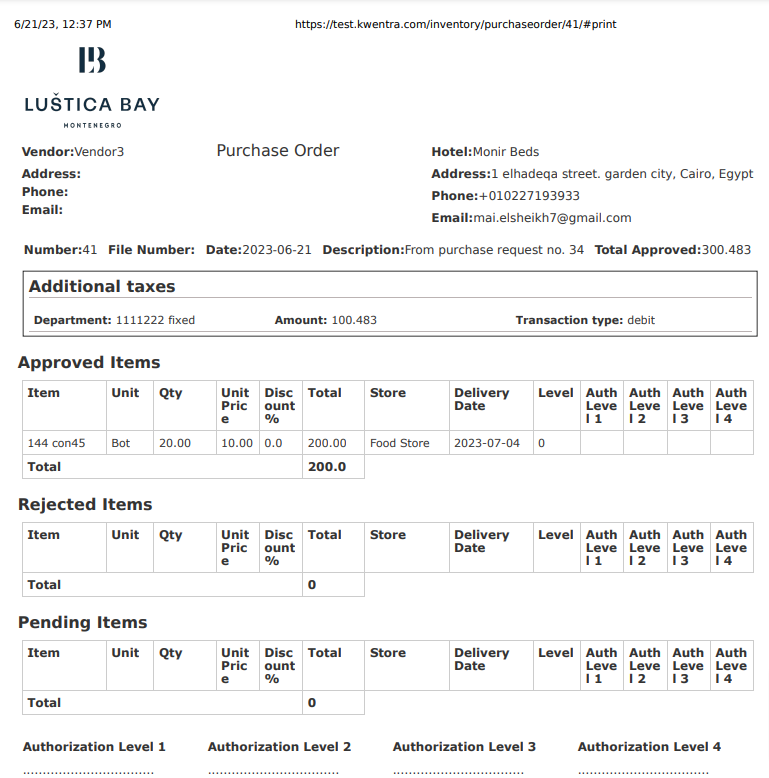
Additional Taxes in Purchase Order screen and print out
BO -> Purshasing -> Purchase OrderWe added the additional taxes fields to the purchase order page and printout to allow you to send it directly to the vendors without editing it manually.- We add the fields on the screens
- Amount: float field, Mandatory, represents the tax amount.
- Department: dropdown list, display all the payable tax department
- Please note that all the taxes in the po are considered debit tax
- we also added the same fields in the printout of the purchase order
- We also added totals for each table in the printout
- and changed the PO total in the printout to only sum the approved items
Store Usage Report Grouping
BackOffice - Reports - Stock Usage ReportWe added the ability to group by the Stock usage report result by item group by selecting Item group in the Group by dropdown list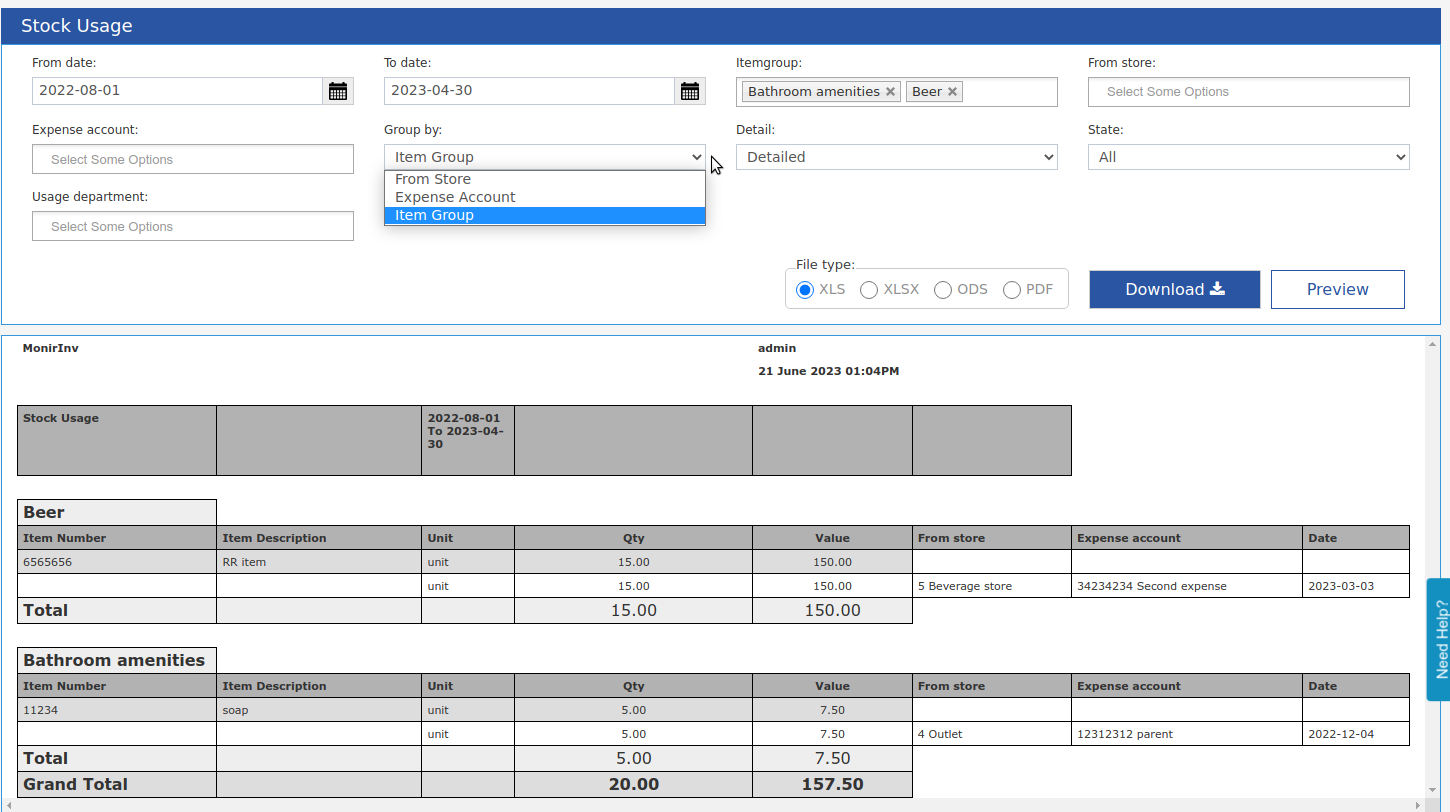
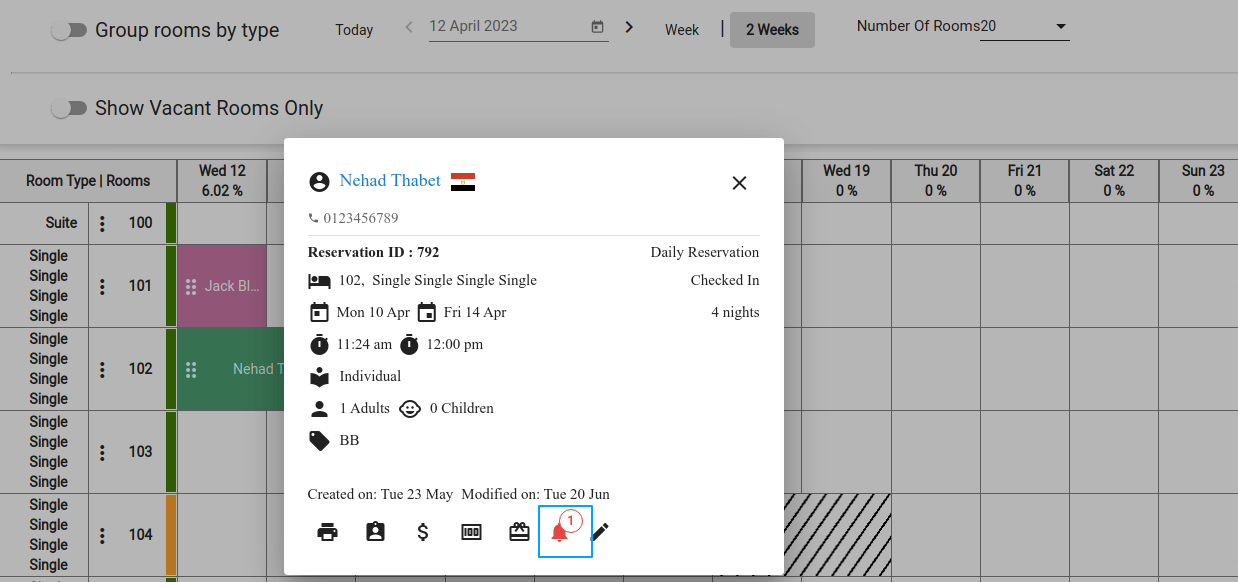
Alerts in room rack
FO -> RoomRackwe added the ability to view, add, and edit alerts on reservations directly from the room rack- in case there are pending alerts on the reservation you will notice an alerts icon on the reservation itself. and clicking on it will open the reservation alerts popup
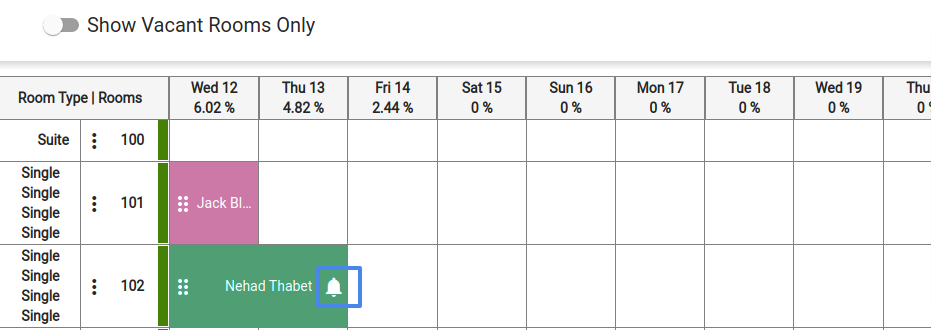
- In the room-rack reservation, popup we added the same icon so you can check and edit current alerts
New Report - Room Upgrades
Report Business Value:The Room Upgrades report enables you to track all room type upgrades that took place in the instance.- Track the date and time of the room type change.
- Track which user performed the action to upgrade the room type for free.
- Filter by specific room types
- Monitor the room type movements
How it works?
Reports → FO → Front Desk → Room Upgrades
- Select the date range you would like to see the room upgrades for.
- Original Room Type “Optional”: choose to run the report for specific Original Room Type, if left empty the report will return all room types.
- Upgraded Room Type “Optional”: choose to run the report displaying all reservations nights that were upgraded to the specified Room type.
- Username “Optional”: choose to run the report to see the actions taken by a specific user.
- Guest Name: returns the name of the main guest for the reservation that has a room upgrade.
- Arrival: returns the arrival date of the reservation.
- Departure: returns the departure date of the reservation.
- Adults: returns the number of adults within the night that has a room upgrade.
- Children: returns the number of children within the night that has a room upgrade.
- Original Room Type: returns the room type that existing on the reservation night before the upgrade.
- Upgraded Room Type: returns the room type that the night has been upgraded to.
- Room number: returns the current room number on the reservation.
- Changed Night: returns the date of the night when the room got upgraded
- Actual Date: returns the actual date of the system where the user made the upgrade
- User: returns the user who took the action on this room number, if its showing admin then this is an automated change performed by the system.
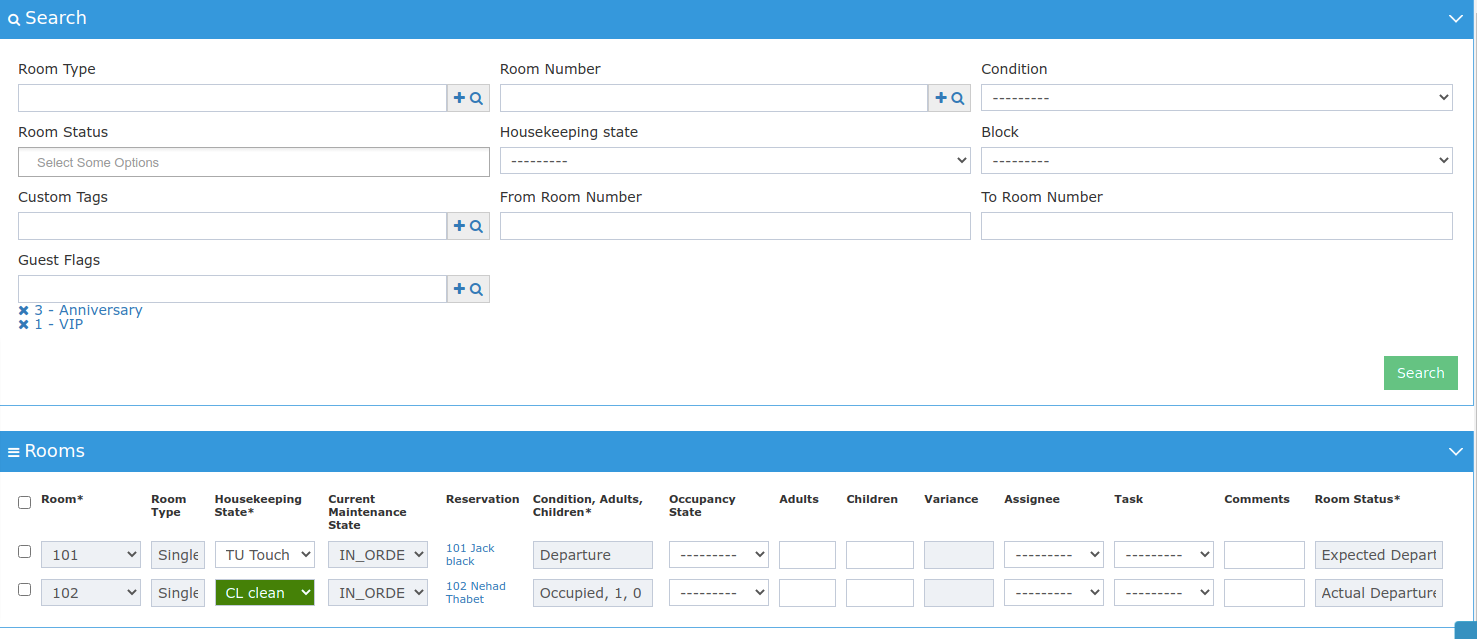
Updates to housekeeping screen
FO -> Housekeeping- We added the ability to search by room number range using From Room number and To Room Number field
- Example: you can now choose to display all rooms from room number 100 to room number 200
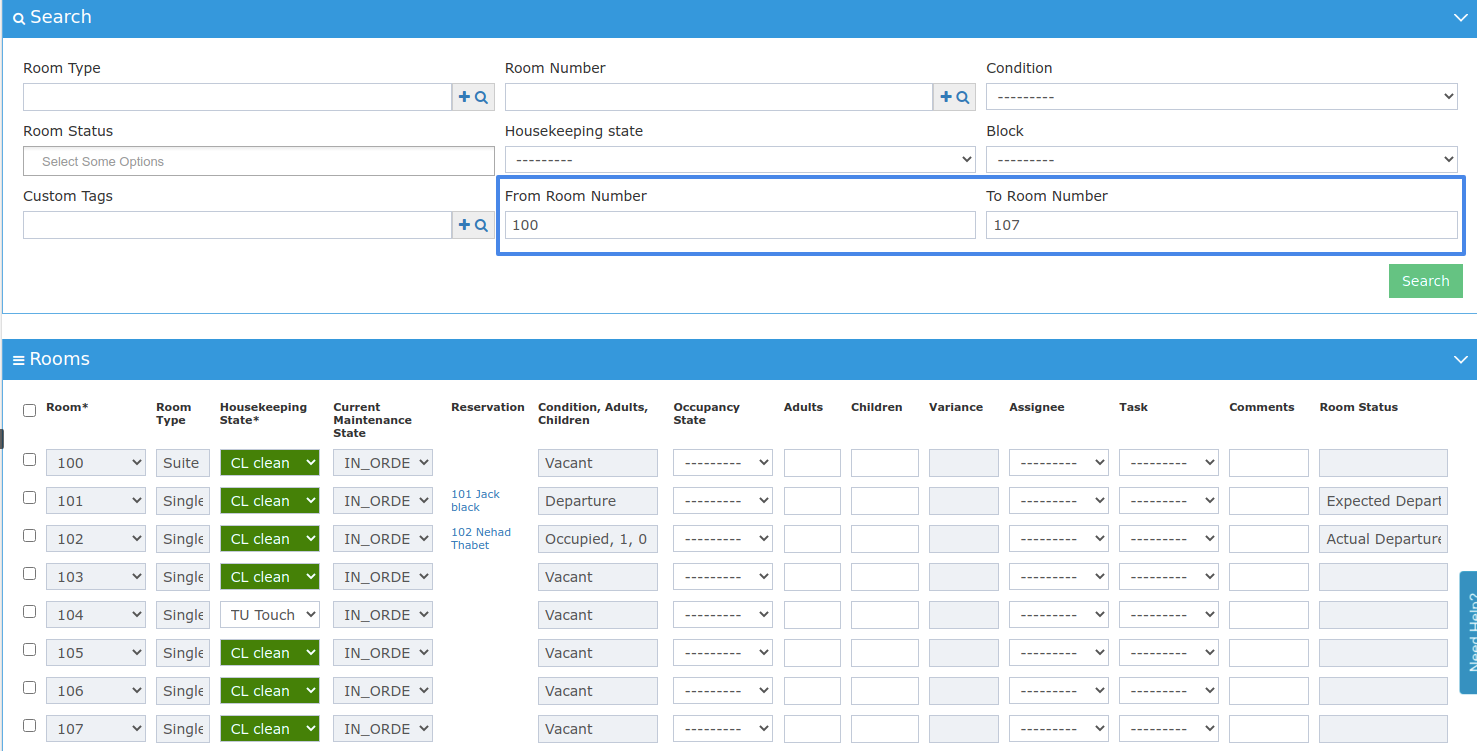
- We also added the ability to filter the rooms with reservation guest flags a. Example: you can now choose to display only the rooms that have VIP or Honeymoon reservations or both
Updates to our Room Rack
FO -> RoomRackwe make some minor changes to our Room Rack- Users without the change housekeeping state permission cannot change the room housekeeping state from the room rack
- Now you can see the out-of-order comment/reason directly from the room rack
June 11, 2023
Updates to cancel no show
We changed the behavior of cancel no show to keep the first night unposted so you can edit it freelyRead moreUpdates to housekeeping page
FO → HousekeepingWe add a new state “Dueout / Arrival“ that appears in the Room Status columnThe state is shown on the room(s) that are currently occupied by a reservation where the expected departure date is today. While the same room has a reservation that’s expected to arrive todayUpdates to ETA Integration when canceling City ledger payment
Reservation Billing Canceling city ledger payment in a folio sent to ETAWe modified ETA service so it recognizes the AR cancellation as a separate folio from the original and as a result, AR cancellations to be sent to ETA portalMay 22, 2023
Ability to Create Purchase Orders in Bulk from Purchase Request
Now you can create multiple Purchasing Orders from a single purchase request. By selecting one or more item(s) and pressing “Create PO” button, the system creates one or more purchasing order(s) depending on the number of vendors for the selected items.You can try this by browsing the following links:Back Office → Purchasing → Purchase Requests → Select a Purchase Request → Select Items → Create POBack Office → Purchasing → Purchase Requests → Select a Purchase RequestSteps required for creating multiple purchasing orders:- Select the Purchase Request you would like to use to create your PO.
- Highlight (check) the items you would like to include in your newly created PO.
- Click on Create PO from the top right of the screen.
- A pop up window will be displayed confirming the different POs to be created, one for each vendor.
- You have the option to edit the quantities required for each item before confirming creating the PO.
- To print your new PO click on Print from the top right corner of the screen.
- Select the status of the items you want to present in your PO whether approved, pending or rejected items.
- Once this order is fulfilled and the items have arrived you can start the
Updates to “Housekeeping All Rooms” Report
Reports → FO → Housekeeping → Housekeeping All RoomsThe report “Housekeeping All Rooms” now has an updated housekeeping state “Dueout / Arrival”.The state is shown on the room(s) that’s currently occupied by a reservation where the expected departure date is today. While the same room has a reservation that’s expected to arrive today.Read moreApril 20, 2023
April 16, 2023
Update to Egyptian Tax Authority (ETA) integration
Front Office -> Settings -> Integrations -> ETAKwentra will now send the profile data linked to a billing window to Egyptian Tax Authority (ETA) upon generating a folio from said window.-
In case no profile is linked to the billing window, the guest data will be sent instead
- Guest profiles are subject to missing data validation, the user will be prompted to complete the missing data before generating the folio.
-
In case any other profile type is linked to the billing window instead (channel/company), the linked profile data is sent to ETA
- Other profile types are NOT subject to missing data validation, the folio will be generated with the incomplete data.
- Folios sent to ETA with missing profile data are rendered Invalid and can be resent upon completing the data.
Update to Housekeeping and Maintenance states
Front Office -> Housekeeping -> Out Of Order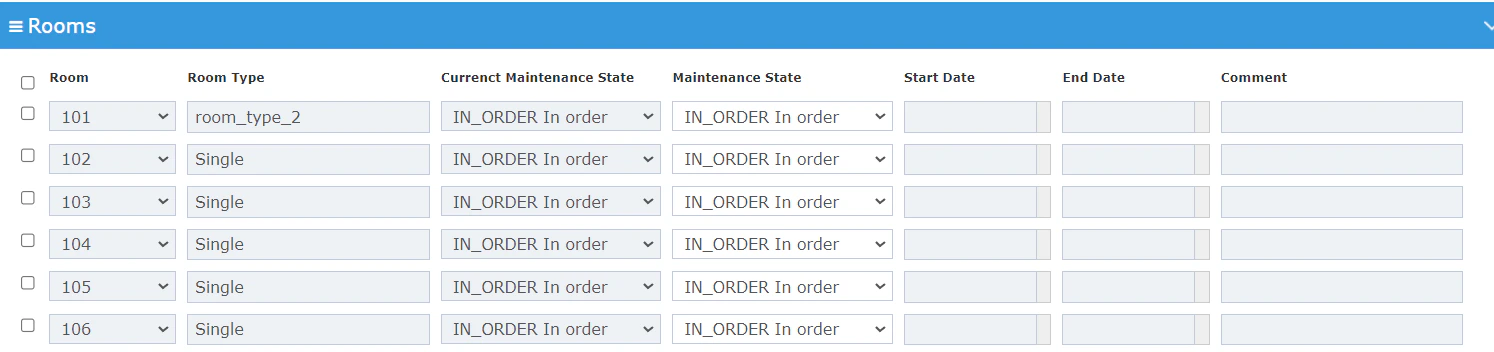
- This change will automatically take place upon night turn.
March 27, 2023
New Consolidated Guest info report
“Guest Info“ report but allows company users to extract all the guests across multiple instancesRead moreUpdates to Housekeeping Tasks
Front Office → Housekeeping → Task list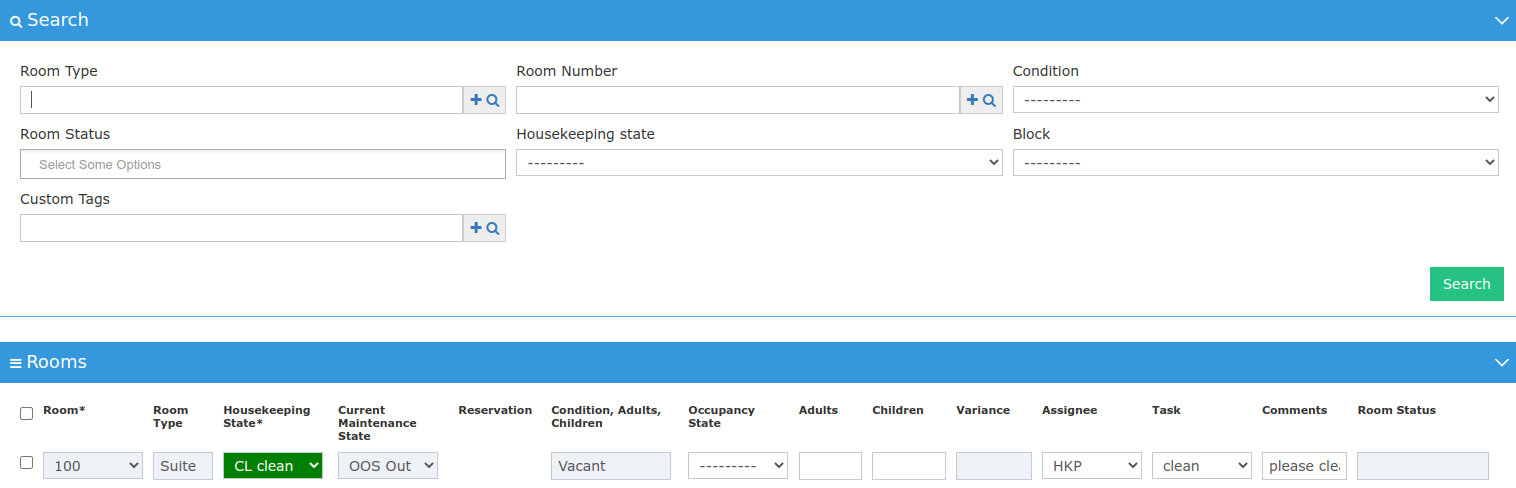 We added Email notifications to the housekeeping tasks, 3 types of emails
- Assigning new task email: (To assignee )
- Task completed email: (to all housekeeping supervisors )
- Deleting a task email: (To assignee )
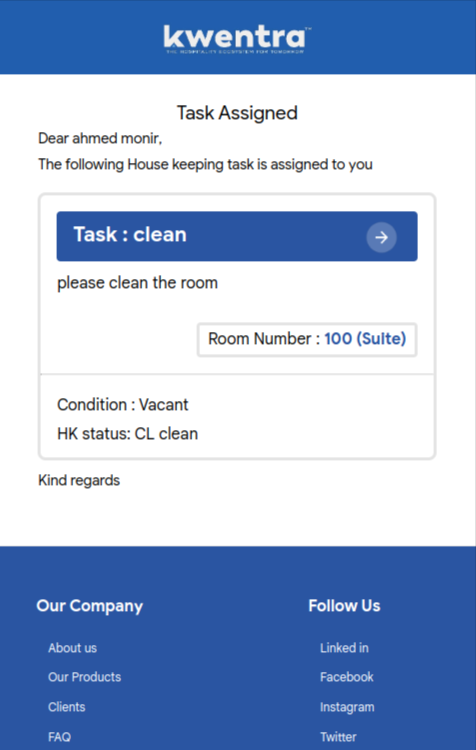 In order for the email notification to work make sure all house keeping users are updated with their emailsRead more
Updates to Market segment report
Reports → Front Office → Reservation → Market segment Report update:The market Segment report got its data from the setup done for Channels, Sources & Markets in FO SettingsWe changed the report to Use reservation market and source instead of saved configurationsIn case the reservation source or market is empty we use configured market and source in saved configurationsIn case no configuration for this channel exists show the reservation and its data in the others sectionRead moreMarch 5, 2023
New Report Vendor Listing Details
Vendor Listing Details Report helps you see the transactions and Journal Vouchers created on Vendor accountsRead moreUpdates to Our Vendor payment report
Report Update: we added some updates to Our Vendor payment report- Leaving the vendor field empty will now run the report on all vendors
- We added a check box: Show only payments, when checked, the system will hide the receiving orders and show payments only
- We added a drop-down list “Payment Type “ to enable filtering report data by payment type (Cash, Cheque, or both)
- In the report itself, we added a column to display Vendor Name
 Read more
Updates to “Supplier Receiving” report
Reports > Back Office > Accounts Payable > Supplier ReceivingReport update: The Supplier Receiving report has been enhanced with:-
The ability to filter the report by certain vendor(s) using the new “Vendors” report parameter.
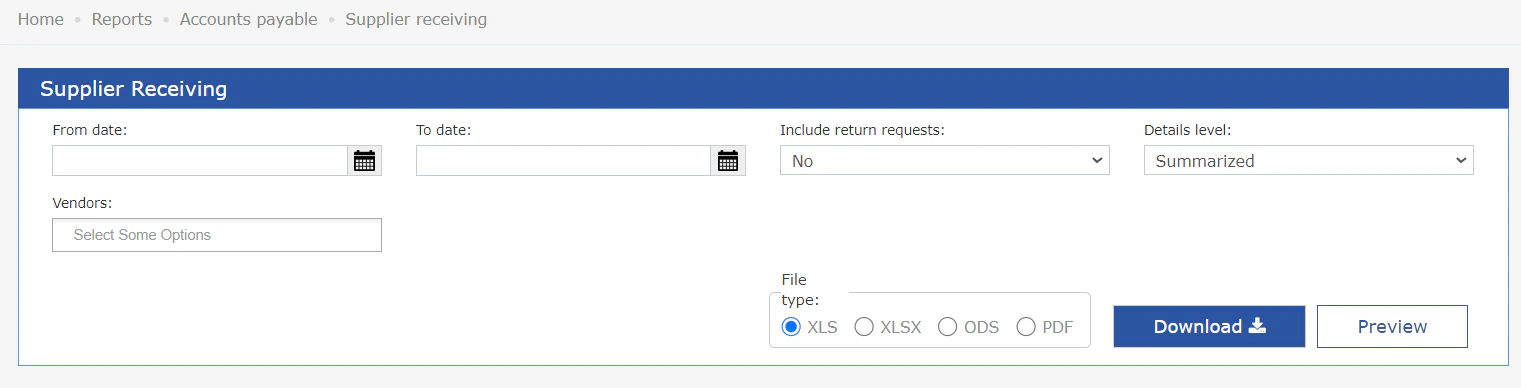
- The report will now display the data grouped by vendors.
-
A simpler version of the report is now accessible through the “Detail level” menu.
- This version will omit the receiving order details from the report but will still display the total amounts.
Ability to generate a Confirmation Template without rate information
Front Office > Reservations > Individual reservationsNow kwentra allows you to generate a confirmation template that does not include any information regarding the rate amount.The option “Confirmation (No Rate)” should be found under “Print / Email” button located in the individual reservation screen.You can print or send the confirmation template without the rate details for guests coming through a tour operator or a travel agency with a special rate amount.Updates to Rooming list import and Export
Feature Update: We implemented some enhancements to exporting and importing a rooming list- Export now will have a column with the reservation Id
- Now the user has the ability to import part of the rooming list using the IDs of the reservations
- Entered ID must be valid and belongs to the group reservation
February 13, 2023
Adding the ability to close PO
Feature Update:-
We created a feature “Close“ on the Purchase order level
The button allows the user to close the Purchase order and apply no further actions to it
- This option is available on Purchase orders that have no receiving order(s) or Purchase orders that are partially received
-
We created the field “Comment“ to be found on the item level to be used in case of closing a Purchase order that’s partially received
- In case the user is closing a Purchase order with 1 or more item that has a quantity different than the received quantity, the User cannot close the Purchase order without providing a comment on an item that’s not fully received
- Closed Purchase orders will have the status “received“ and closing a Purchase order will not affect the quantities in any way.
-
We created a new field for closed Purchase orders “Original Qty“
- The field should represent the original quantity of the Purchase order as it was created.
-
The Purchase Request linked to the closed Purchase order should read its “ordered quantity“ from the Purchase order → “Received Qty” field. This is in order to reflect the correct information on the Purchase request level and to enable the user to create a new Purchase order with the remaining qty in the request. Example:
- Purchase request created with qty 100
- Purchase order created with the 100 qty
- Receiving order created with 70 qty and Purchase request ordered qty is 100 and Purchase request received qty is 70
- The purchase order is closed and the Purchase request ordered qty is 100 and the purchase request received qty is 70
- The user has the ability to create a new Purchase order with the remaining qty (30)
AR Aging Report - Exclude Unposted JVs
We applied the following change in the Accounts Receivable Aging Report:All Information shown within the report now represents “posted” Journal Vouchers.You can see the change yourself by running the report on the following path: Reports → BO → Receivable → AR aging”Store Transfers and Store Usages to allow requesting more than the available quantity
Feature Update:We have applied the following changes to - Store Transfers and Store Usages screens- We Removed the validation that prevents saving the usage/transfer if the requested quantity more than the available quantity. so now the requested quantity more than the available quantity can be saved
- We Change the approved quantity to the minimum value between the requested quantity and the available quantity. so for example:
- if Item Cola has an available quantity of 500 and the requested quantity of 2000 the approved quantity will be 500 by default
- if Item Cola has an available quantity of 500 and the requested quantity of 200 the approved quantity will be 200 by default
- We blocked approving the transfer/usage so users cannot approve more than the available quantity
- We added the approved quantities and values to the approved transfer and usage printouts
- Some changes were added to transfer and usage printouts to enhance it
Updates to our Item Units Displayed
We have updated the item units in our system to match the units that has been setup on the Item level.Now whenever you select an Item, only the corresponding units applicable to this item are displayed.This change affects the following pages:- Back Office → Purchasing → Purchase Order
- Back Office → Purchasing → Purchase Request
- Back Office → Purchasing → Receiving Order
- Back Office → Purchasing → Return request
- Back Office → Inventory → Store Transfer
- Back Office → Inventory → Store Usage
Manager Report to Consider Future Reservation Charges for Future Dates
We have applied the following changes to the Manager Report: (found in “Reports → FO → Manager Report”)In case of running the report for dates in the future, the system now calculates the future charges that should exist on any upcoming reservation and includes this forecasted information within the report parameters; Specifically the ADR (Average Daily Rate) equation.Occupancy Statics Report
New Report: a new Occupancy Statics report that shows the Occupancy status change and its details.January 22, 2023
A new column in receiving lists to show the status of its Journal vouchers
Feature Update: A new column is added to show the status of Journal vouchers for the following lists- Manual Receiving
- Inventory Receiving
- Vendor Payments
- Back Office > Purchasing > Receiving Orders
- Back Office > Accounts Payple > Manual Receiving
- Back Office > Accounts Payable > Vendor Payments
Ability to Transfer Remaining Account Receivable Deposit to Different Department
Sometimes the financial team requires the Account Receivable to have no remaining deposits by the time of closing the month.We created the feature “AR Payment Transfer”. The feature enables you to transfer any remaining amount found within a payment/deposit that has not been allocated to invoices yet.Upon selecting an AR payment, you’ll find the new tab “Transfers”. The tab lists all transfers applied linked to the selected Payment. Within the transfer tab there’s the new button “Transfer” that allows you to transfer any remaining amount within the payment to any “Credit” type department that exists in the instance.You cannot create a transfer with a date falling within a GL Restricted Period.
You cannot cancel a transfer or cancel the AR Payment that falls within a date within a GL Restricted Period.
AR Invoices Report - Include Column for Base Currency Amount
Report update: The “AR Invoices” report will now display the “Base Currency Amount” for each AR invoice.Reports > Back Office > Receivable > AR InvoicesThe column “Base Currency Amount” represents the total amount of the invoice following the base currency of the instance. In case the original currency of the invoice is in Base Currency, the column will represent the same value as the existing column “Amount”.Marking rooms as “Out of service” for a certain period and assigning them to reservations.
New feature: You are now able to mark rooms as “Out Of Service” for a certain period using the newly added “Start Date” and “End Date” fieldsFront office > Housekeeping > Out Of Order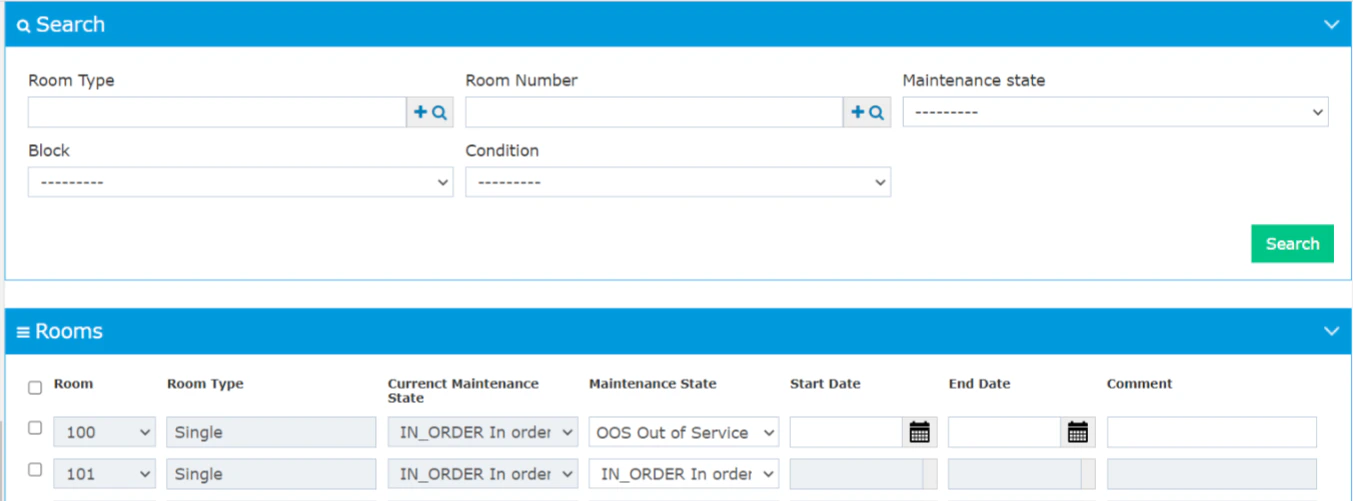
- Start Date Indicates the date the “Out of Service” state should start on
- End Date indicates the last date the “Out of Service” state should be active on.
- Comment
- From the Room Rack
- From the Individual Reservations Screen
- Individual Reservation → Add Mode
- Individual Reservation → Edit Mode
- Room Rack → Quick Add
- Room Rack → Add Reservation
- Room Rack → Edit Reservation
Updates to Profiles list and Guest profiles
Feature Update:- A new Icon is added to the Guest profiles list to show guest history
- Also, a Guest history button was added to the guest profile to show the guest history
 Front Office > ProfilesRead more
Updates to Reservation folios, proforma and information invoices
Feature update:Now if the billing window is connected to a company or channel profile, the following templates will show the email, phone number, vat number, and registration number of the connected profile- default template
- detailed template
- ksa legal template
January 2, 2023
Updates to journal vouchers involving credit card departments
Feature Update: The Journal voucher involving a credit card payment with linked company to an account receivable will now display the intermediary credit card account in the same journal voucher without affecting the account balance.Back Office > General Ledger
Update for Kwentra Compliance Companion App
Feature Update: A new update for ETA integration settings in our Compliance Companion App that allows you to select multiple properties and apply the integration settings to all selected properties at once.Update to billing instructions routing display
Feature update: users are now able to see the billing instructions routing for the destination as well as the source.Front Office > Reservations > Individual Reservations > Billing > Charging Instructions > Billing instructions.When a user sets billing instructions from a certain reservation (source reservation) to another reservation or a paymaster (destination), the user is now able to see the billing instruction routing on both source and destination reservation/paymaster billing screen.Update to “Close Cashier” permissions
Feature update: cashier users with “close cashier” permission are now limited to only be able to close their open cashier and not any other open cashier from the “Close Cashier” screen.Front Office > Income > Close CashierNote: A new permission is created to allow users to close any open cashier from the “Close Cashier” screen, this permission is only granted to the following permission groups:- Income Auditor
- Night Auditor
Update to “Guest info” report
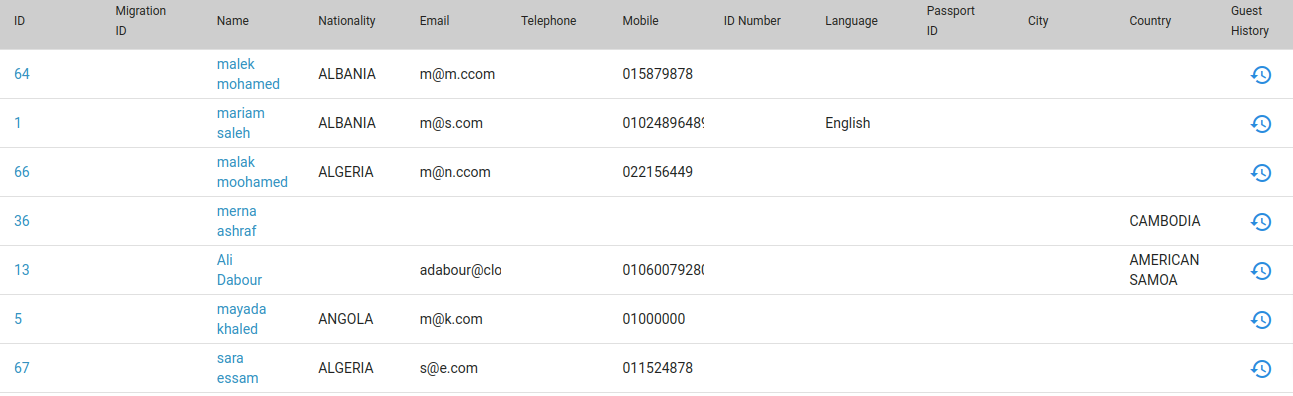
Report update: The “Guest Info” report will now display the “City” for each listed guest (if applicable)Reports > Front Office > Reservations > Guest infoThe “city” displayed in the report is based on the city field in the latest contact address added to the selected guest profile.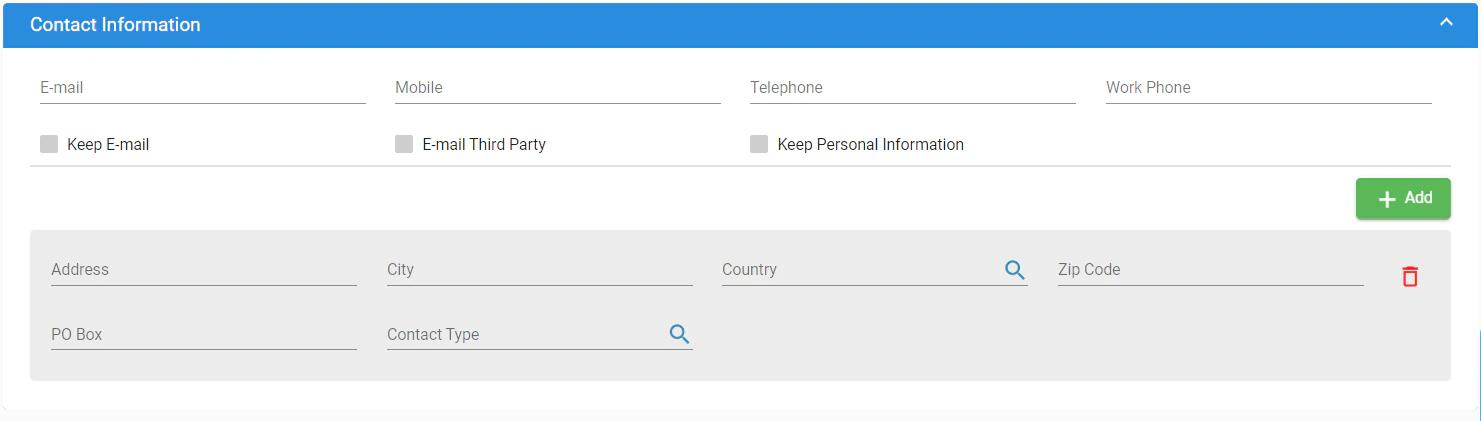
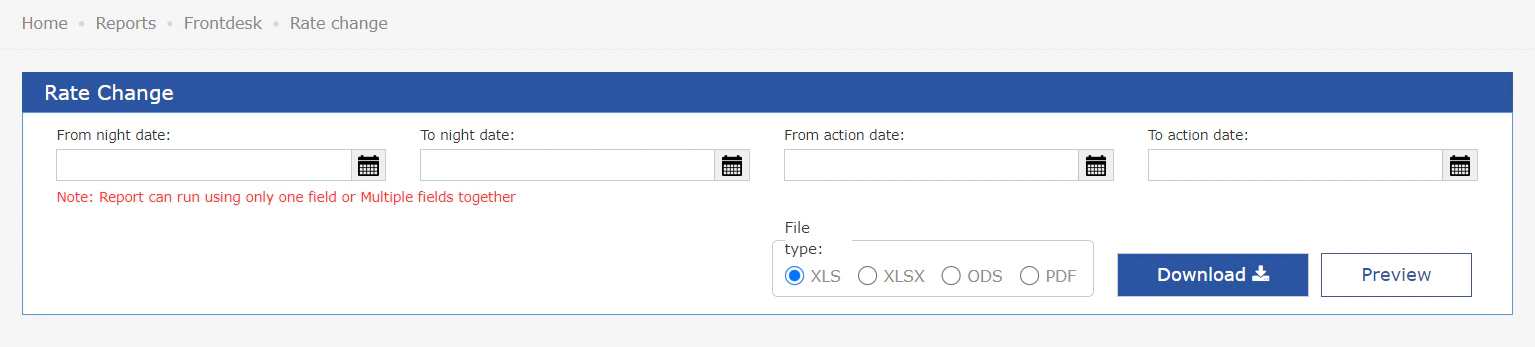
Update to the “Rate Change” report
Feature update: The “Rate Change” report now has a new parameter to filter the report further:- Action Date
Updates to “Account Transfer” feature.
Feature update: A new permission is created to allow users to transfer postings to both “Checked in” and “Expected” reservation accountsUsers without this permission are only able to transfer postings to another reservation account with state “Checked in” and “Open” paymasters- Front Office > Reservations > Individual reservations > Billing > Selected Postings > Tools > Account Transfer
- Front Office > Income > Paymasters > Billing > Selected Postings > Tools > Account Transfer
Refunding a “Pay to Room” POS invoice
Feature Update: You are now able to fully refund a POS invoice originally paid using “Pay to room” method while the following E-invoicing integrations are enabled:- Egyptian Tax Authority Integration
2023